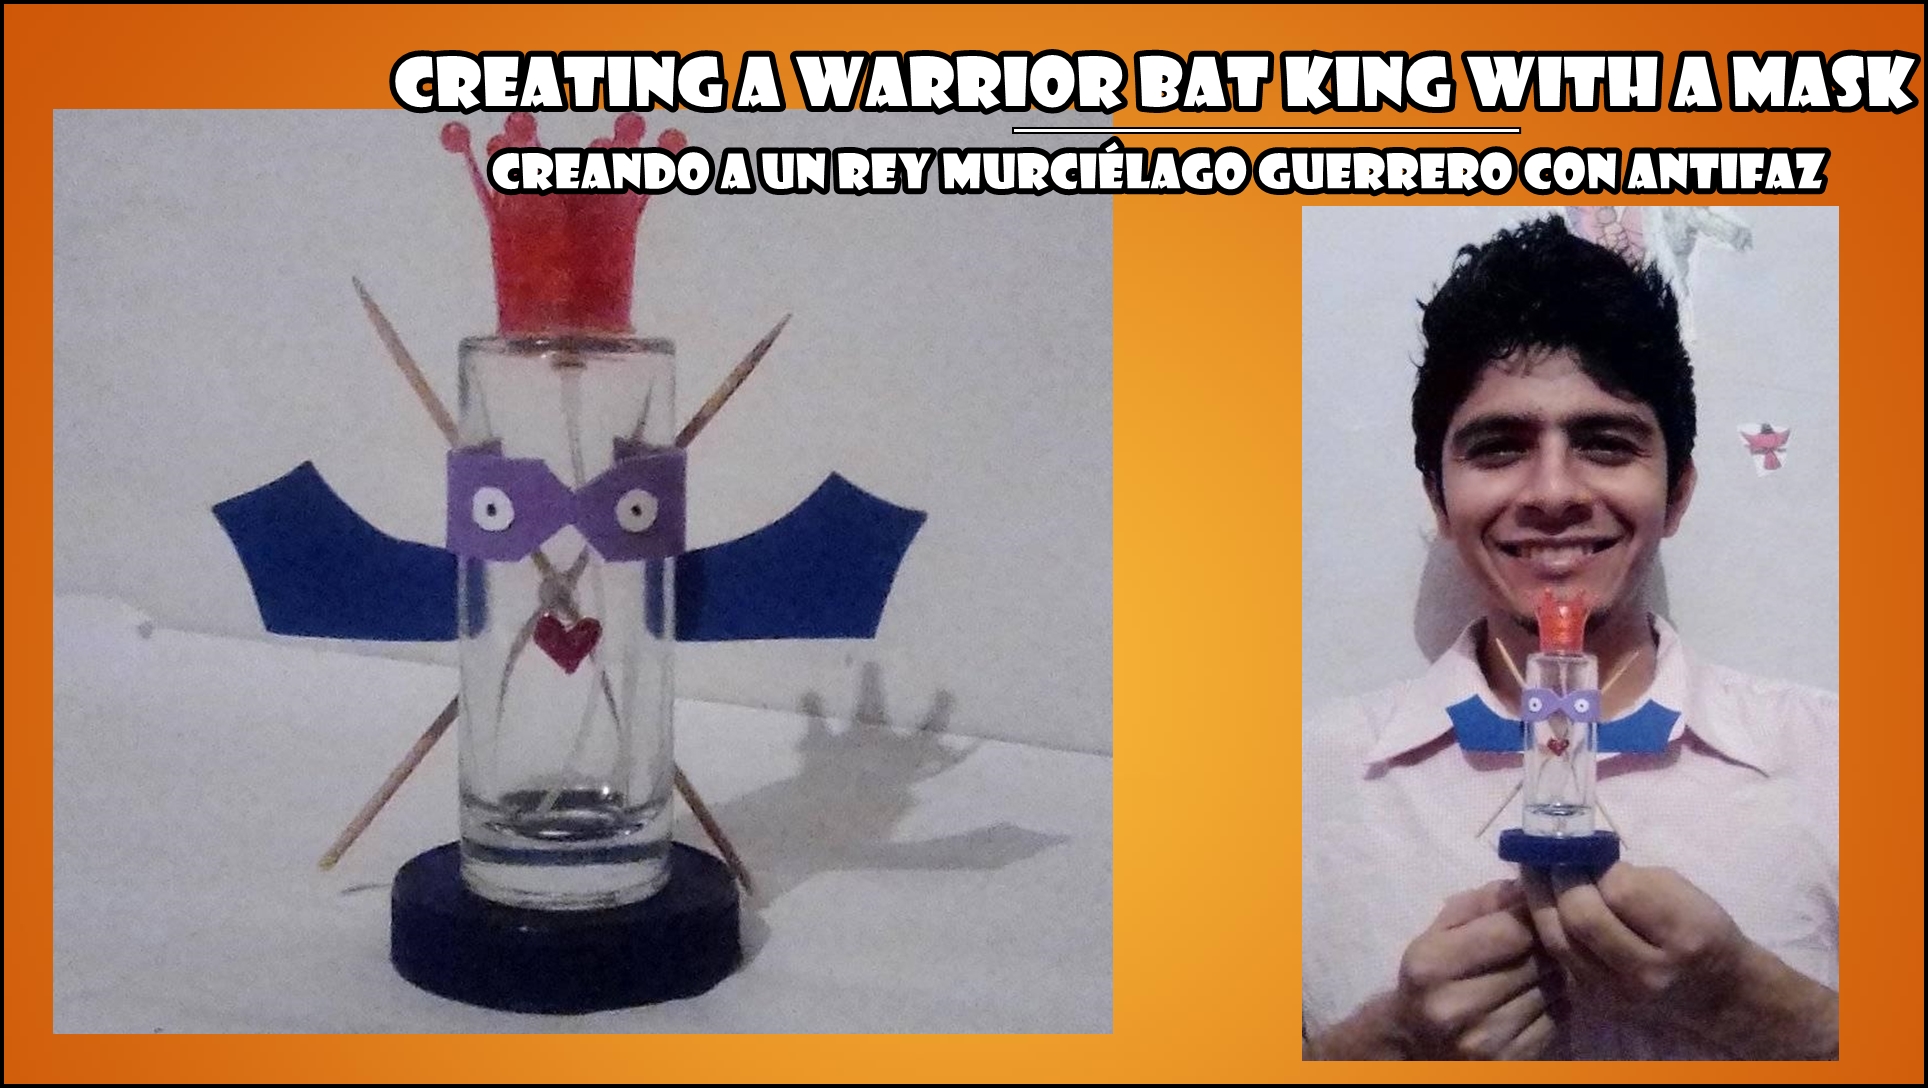
[ENG - ESP] Creating a Warrior bat king with a mask| Creando a un rey murciélago guerrero con antifaz
Today I feel very well and I thank God and you for giving me the opportunity to share this beautiful creation.
On this day, I had little material, but a lot of imagination, I wanted to make a character, but I did not want to do something common and I said: So I will create a bat, but at the same time a king and a warrior with a mask.
I laughed a lot at the funny result and then I decided to share it with you, these are the steps I used:
Espero que todos estén bien, feliz fin de semana tengan todos.
Hoy me siento muy bien y agradezco a Dios y a ustedes por darme la oportunidad de compartir esta bonita creación.
En este día, tenia poco material, pero mucha imaginación, tenia ganas de hacer un personaje, pero no quería hacer algo común y dije: Entonces creare un murciélago, pero a la vez que sea un rey y un guerrero con antifaz.
Me dio mucha risa el divertido resultado y entonces decidí compartirlo contigo, estos son los materiales y los pasos que use:
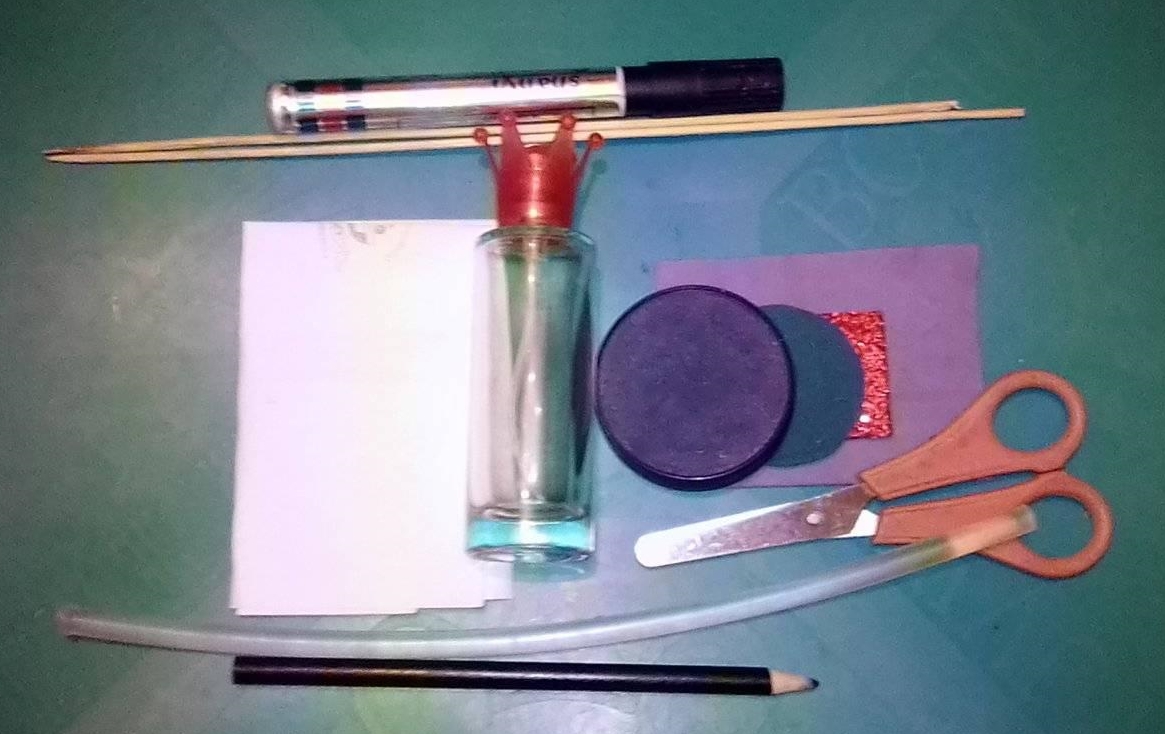
•1 Empty glass perfume bottle.
•Lid of a mayonnaise container.
•Foami color: blue, purple, red with frosting.
•High chopsticks.
•Recyclable sheet.
•Black marker.
•Crayon pencil.
•Scissors.
•Silicon.
•sewing thread (optional).
•1 Envase de vidrio vacío de perfume.
•1 Tapa de un envase de mayonesa.
•Foami color: Azul, morado, rojo con escarchas.
•Palillos de altura.
•Hoja reciclable.
•Marcador negro.
•Lápiz crayón.
•Tijera.
•Silicón.
•Hilo de coser (opcional).
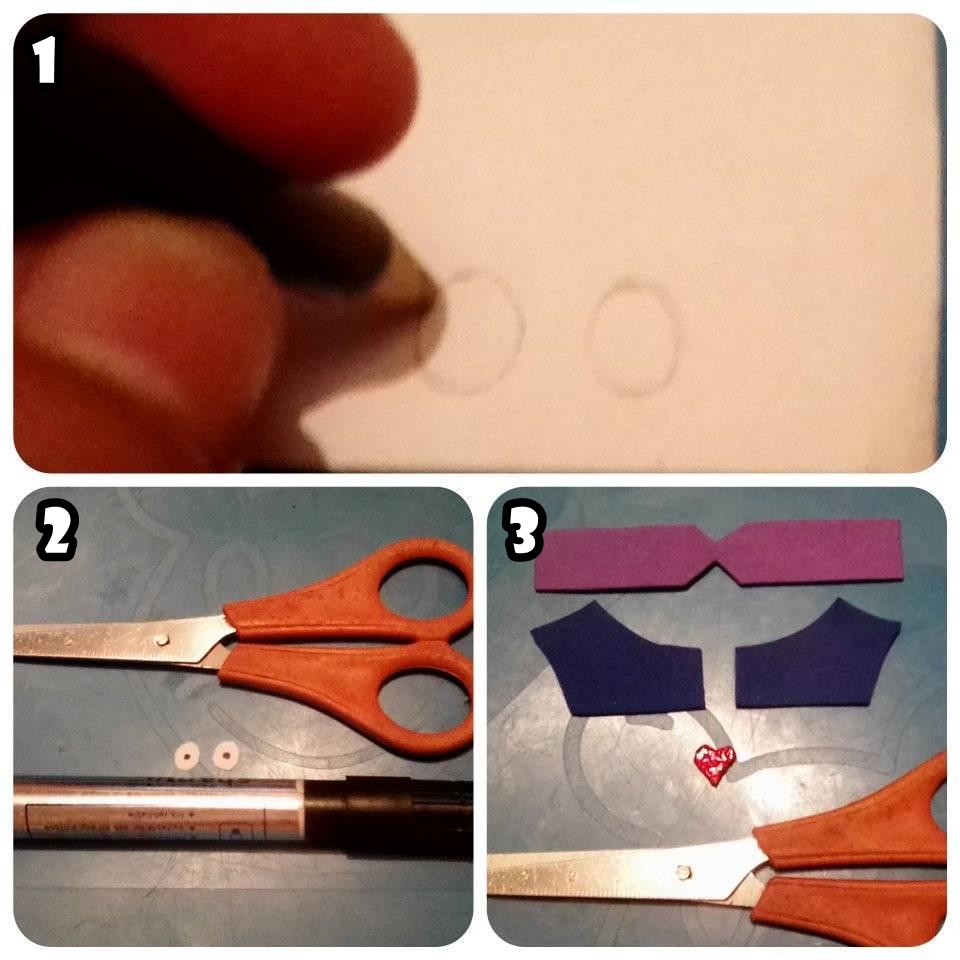
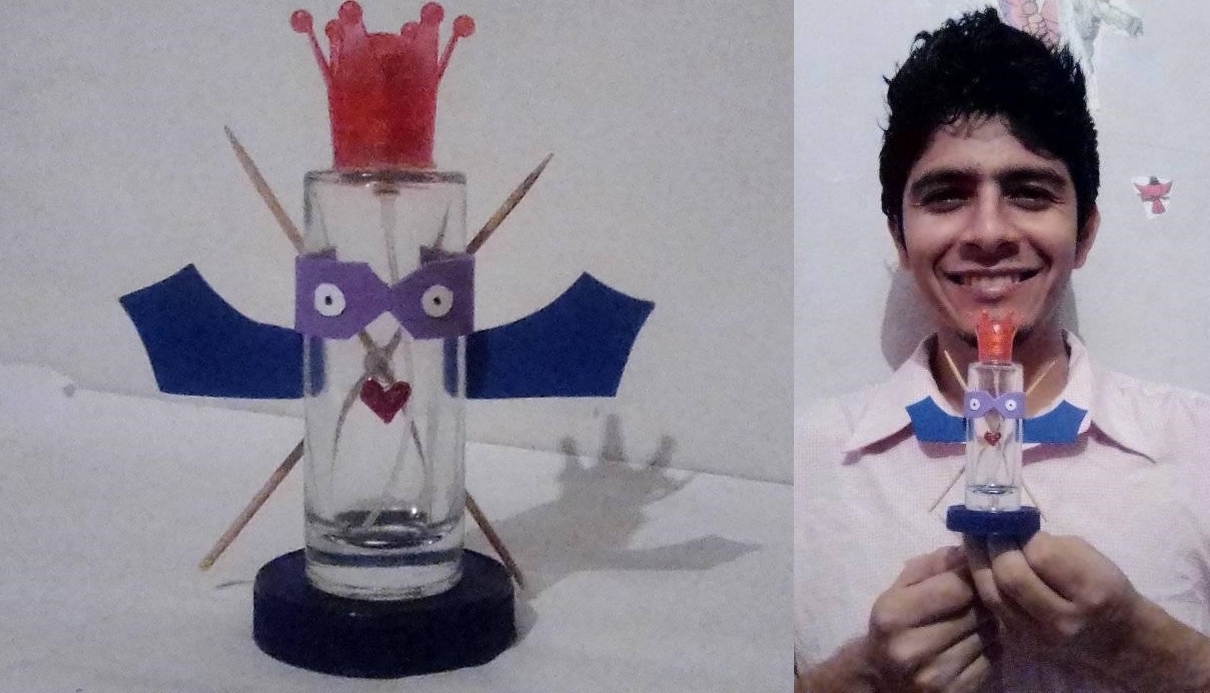
•STEP 1: Draw 2 small circles on the recyclable sheet with the pencil (these will be the eyes).
•STEP 2: With the black marker we make a dot in the middle of each circle we just drew, then we use the scissors and cut it out.
•STEP 3: Cut out a strip of purple foami giving it the shape of the mask, then cut out 2 small pieces of blue foami and shape them as wings, then cut out a small heart-shaped piece of red foami with frosting (this will be the mouth).
•PASO 1: Dibujar 2 círculos pequeños en la hoja reciclable con el lápiz (estos serán los ojos).
•PASO 2: Con el marcador negro hacemos un punto en medio de cada círculo que acabamos de dibujar, luego usamos la tijera y recortamos.
•PASO 3: Recortamos una tira del foami color morado dándole forma del antifaz, luego recortamos 2 trozos pequeños del foami azul y damos forma de alas, seguidamente recortamos una pieza pequeña en forma de corazón del foami rojo con escarchas (esta será la boca).
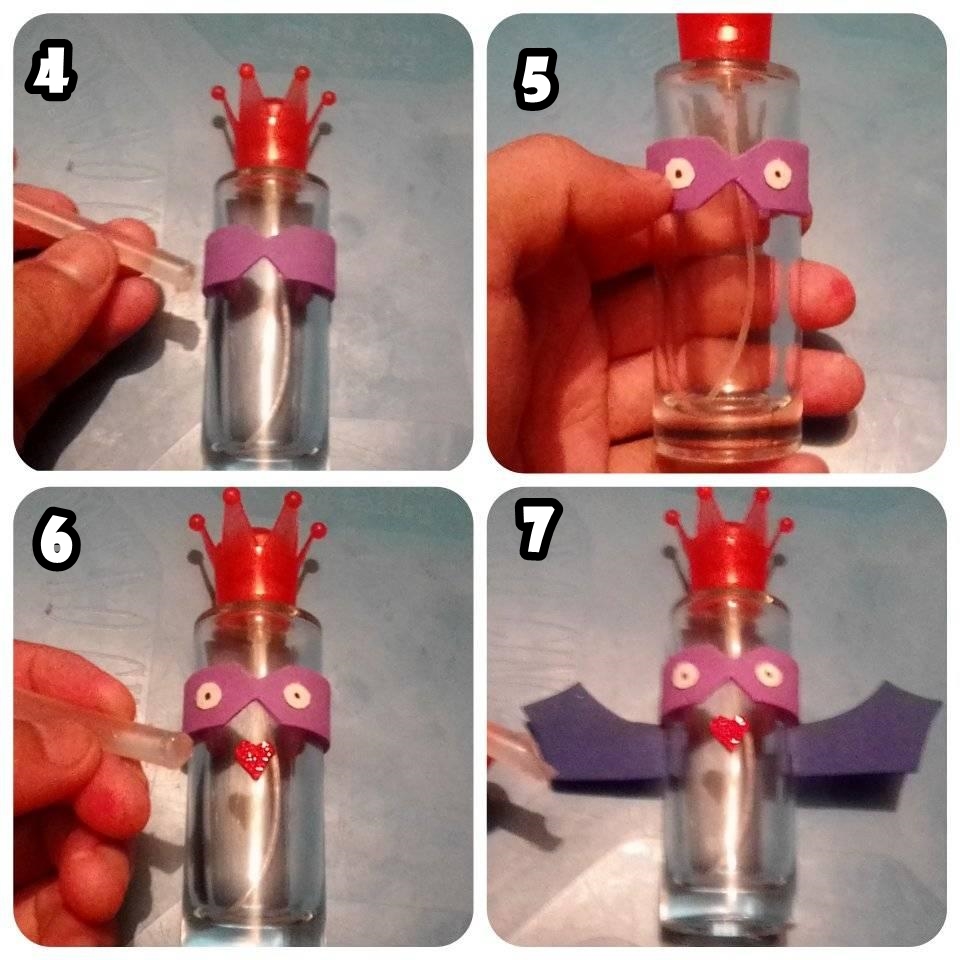
•STEP 4: Glue the purple mask-shaped foami to the perfume bottle with silicone.
•STEP 5: Glue the 2 eye-shaped circles on top of the mask, leaving a space of ½ centimeter "simulating 2 eyes".
•STEP 6: Glue the heart-shaped foami in the middle and ½ centimeter from the eyes (this is the character's mouth).
•STEP 7: Glue the 2 pieces of blue foami in the shape of wings to the sides of the perfume bottle with silicone.
•PASO 4: Pegar con silicón el foami morado con forma de antifaz al envase de perfume.
•PASO 5: Pegar los 2 círculos en forma de ojos encima del antifaz, dejando un espacio de ½ centímetros “simulando 2 ojos”.
•PASO 6: Pegar el foami en forma de corazón en medio y a ½ centímetros de los ojos (esta es la boca del personaje).
•PASO 7: Pegar a los laterales del envase de perfume con silicón las 2 piezas de foami color azul con forma de alas.
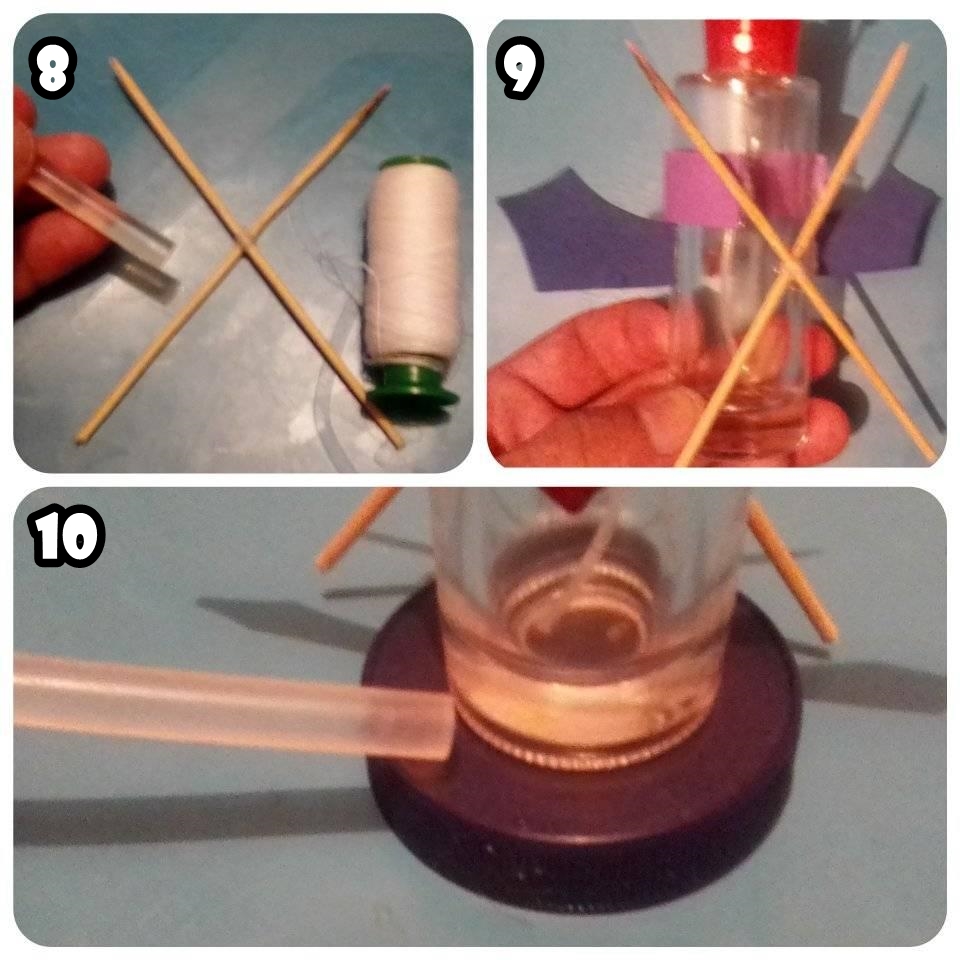
•STEP 8: Cut 1 toothpick in half and join them together in the shape of an "X" using silicone or sewing thread.
•STEP 9: We glue with silicone the "X" we just created, to the back of the perfume bottle (simulating 2 crossed swords).
•STEP 10: In this last step, we glue with silicone our character to the bottom of the mayonnaise container lid, and thus we finish the creation of our beautiful character.
•PASO 8: Cortamos 1 palillo de altura a la mitad y los unimos en forma de una “X” usamos silicón o hilo de coser.
•PASO 9: Pegamos con silicón la “X” que acabamos de crear, a la parte trasera del envase de perfume (simulando 2 espadas cruzadas).
•PASO 10: En este último paso, pegamos con silicón nuestro personaje por la parte inferior a la tapa de envase de mayonesa, y así terminamos la creación de nuestro bonito personaje.
All photos are my own, edited in PhotoScape, translator used: DeepL.
Congratulations @deivisperez! You have completed the following achievement on the Hive blockchain and have been rewarded with new badge(s) :
Your next target is to reach 3000 upvotes.
Your next payout target is 500 HP.
The unit is Hive Power equivalent because your rewards can be split into HP and HBD
You can view your badges on your board and compare yourself to others in the Ranking
If you no longer want to receive notifications, reply to this comment with the word
STOP