[ES-EN] Peakd's Curated Collection (Colección de Posts) | Dito Ferrer

This image is a edit using the source
A medida que vamos creciendo en Hive, también lo hace el número de publicaciones de nuestro perfil. Esto puede llegar a convertirse en un problema, sobre todo si queremos acceder a alguna de ellas rápidamente. Es bastante tedioso navegar entre un maraña de publicaciones intentando encontrar algo. Si es incómodo para nosotros, ¿cómo será para el amigo que amablemente visite nuestro blog? Queremos que encuentre un sitio organizado, bien estructurado. Al fin y al cabo, el aspecto de nuestras cosas dice mucho de nosotros, no?
Para resolver este problema vamos a utilizar una de las herramienta de Peakd. Exacto! Esta magnífica interface que utilizamos a diario para publicar en Hive.
Si no has estado viviendo bajo una piedra los últimos tiempos, sabrás que esta es una de las front-end más utilizadas en todo el ecosistema debido a su facilidad de manejo y sus diversas opciones, especialmente luego de la última actualización en la cual mejoraron el layout y otras muchas cosas.
Aunque la utilizo a diario, hay muchas opciones bajo mis dedos de las que no me había percatado. Una de ellas es la de crear colecciones, una manera muy sencilla de organizar publicaciones afines a un mismo tema.
Ya tengo varios textos de ficción escritos hasta el momento así que vamos a crear una colección para agruparlos a todos.
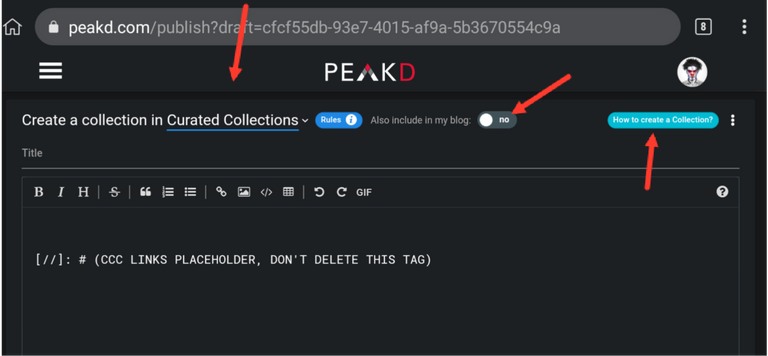
Primero, clickamos en nuestro avatar y se desplegará el menú que se encuentra debajo de nuestra foto de perfil y clickamos en crear colección de posts.

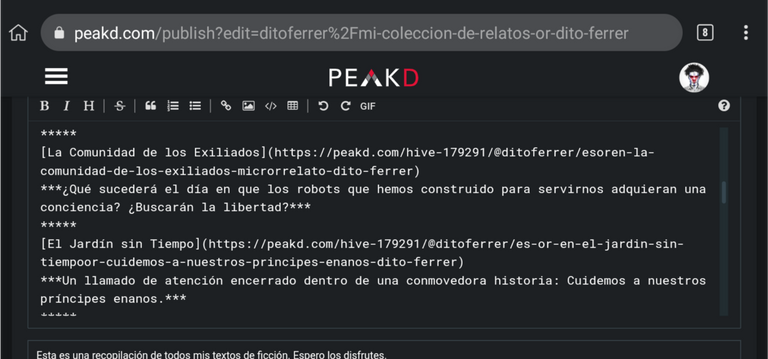
Nos aparece el editor de publicaciones.
Podemos ver que la colección se publicará por defecto en Curated Collections, esto lo podemos cambiar y seleccionar la comunidad que deseemos.
También podemos añadir la colección a nuestro blog.
En el borde superior derecho, si clickamos en el área coloreada en verde, nos aparecerá una casilla que también indica las instrucciones que debemos seguir.
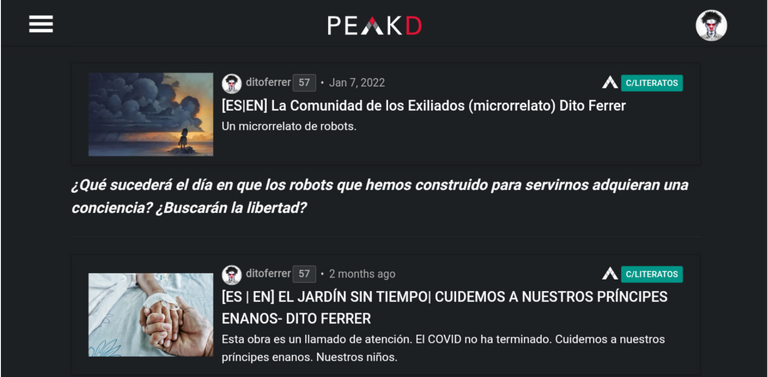
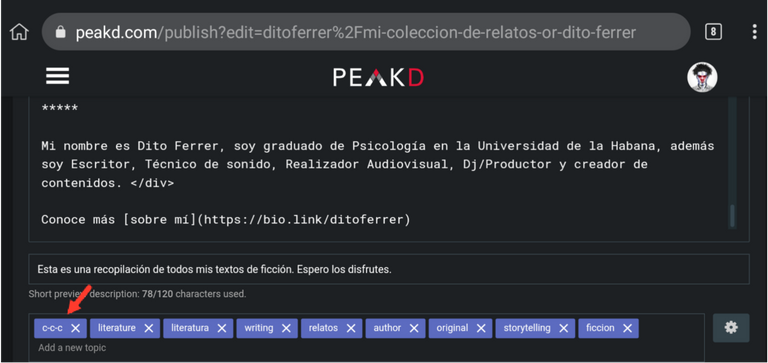
La primera línea de texto que aparece por defecto es el placeholder. Es importante que no lo borres ni lo edites. Debajo escribimos nuestro contenido, que no es más que los links de nuestras publicaciones. Como tip te puedo aconsejar que copies previamente todos los links que quieras añadir a un bloc de notas. De esta manera no tienes que salir del editor cada vez que necesites añadir uno nuevo.
Debajo de cada link escribe una breve descripción. Puedes ponerte creativo y experimentar con diferentes tipos de letra para darle un look más interesante. En el ejemplo te muestro el código y el resultado final.
Una vez añadido todo el contenido, pasamos a colocar las etiquetas correspondientes a tu tipo de colección. En mi caso, relacionadas con la literatura. Ten en cuenta que no debes borrar la primera de ellas(c-c-c)
Cuando te hayas asegurado que la información es correcta publicamos la colección.
Nos dirigimos a nuestro blog y ya vemos que se nos creó una casilla que antes no existía: (Collections) si clickamos en ella, podemos ver la colección que acabamos de crear.
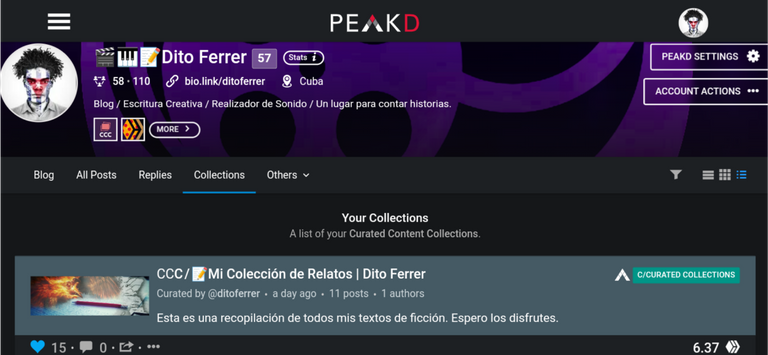
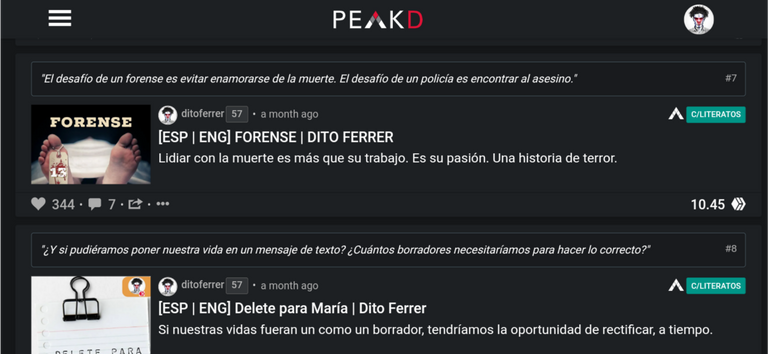
Todo queda muy organizado, con las publicaciones numeradas, la descripción fácilmente identificable, colocada arriba y con un tipo de letra más pequeño, y la comunidad en que fue publicada.
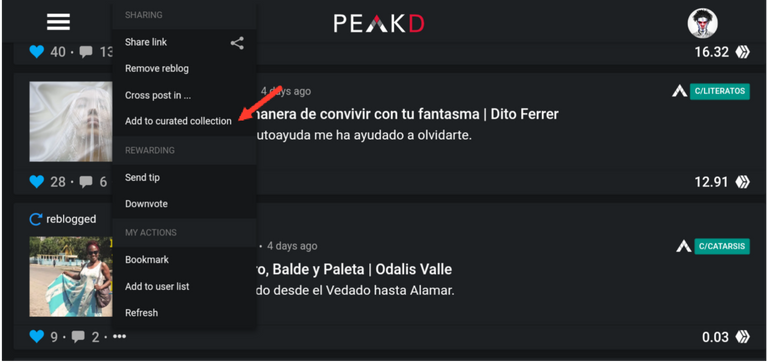
Cuando queramos añadir nuevos posts a la colección, solo nos dirigimos a su menú y seleccionamos Add to curated collection, nos saldrá una ventana donde seleccionaremos la colección y añadiremos su descripción. Al finalizar clickamos en Add.
Si por el contrario, queremos crear una nueva coleccion, solo seleccionamos +New Collection y sigue los pasos que te explico arriba.

En mi caso, esta colección es para unir todas mis historias de ficción en un solo sitio, pero tú puedes querer agrupar todos tus tutoriales o artículos de un tema específico, quizás te dedicas a la fotografía y quieres organizar una serie. Incluso puedes hacer una recopilación de los posts de tus autores favoritos bajo una sola categoría. Tú decides, son muchas las posibilidades.
Luego ya la podemos compartir, rebloguear o promocionar, igual que lo hacemos con nuestros posts.
¡Incluso obtener votos por ellas!
ENGLISH
As we grow in Hive, so does the number of posts in our profile. This can become a problem, especially if we want to access some of them quickly. It is quite tedious to navigate through a tangle of posts trying to find something. If it is uncomfortable for us, how will it be for the friend who kindly visits our blog? We want them to find an organized, well-structured site. After all, the way our stuff looks says a lot about us, doesn't it?
To solve this problem we are going to use one of Peakd's tools. That's right! This magnificent interface that we use every day to publish on Hive.
If you haven't been living under a rock lately, you will know that this is one of the most used front-end in the whole ecosystem due to its ease of use and its many options, especially after the last update in which they improved the layout and many other things.
Although I use it daily, there are many options under my fingers that I had not noticed. One of them is to create collections, a very simple way to organize publications related to the same topic.
I already have several fiction stories written so far so let's create a collection to group them all.
First, click on our avatar and the menu below our profile picture will appear and click on create collection of posts.
The post editor will appear.
We can see that the collection will be published by default in Curated Collections, we can change this and select the community we want.
We can also add the collection to our blog.
On the top right border, if we click on the green colored area, a box will appear that also indicates the instructions that we must follow.
The first line of text that appears by default is the placeholder. It is important that you do not delete or edit it. Underneath we write our content, which is nothing more than the links to our publications. As a tip I can advise you to copy previously all the links you want to add to a notepad. This way you don't have to leave the editor every time you need to add a new one.
Under each link write a brief description. You can get creative and experiment with different fonts to give it a more interesting look. In the example I show you the code and the final result.
Once you have added all the content, you can place the tags corresponding to your type of collection. In my case, related to literature. Keep in mind that you should not delete the first of them (c-c-c).
When you are sure that the information is correct, we publish the collection.
We go to our blog and we see that we have created a box that did not exist before: (Collections) if we click on it, we can see the collection that we have just created.
Everything is very organized, with the publications numbered, the description easily identifiable, placed at the top and with a smaller font, and the community in which it was published.
When we want to add new posts to the collection, we just go to its menu and select Add to the curated collection, we will get a window where we will select the collection and add its description. When we finish we click on Add.
If on the contrary, we want to create a new collection, just select +New Collection and follow the steps explained above.
In my case, this collection is to unite all my fiction stories in one place, but you may want to group all your tutorials or articles on a specific topic, maybe you are dedicated to photography and you want to organize a series. You can even make a compilation of your favorite authors' posts under one category. You decide, there are many possibilities.
Then we can share, reblog or promote it, just like we do with our posts.
Even getting votes for them!
Muy buen tutorial, quizás en algún momento muchos de nuestros CuHivers necesiten hacer esto así que déjame mencionar algunos aquí para que puedan conocer este tipo de post.
@janetedita @manuelernestogr @ditoferrer @jomancub @noakmilo @crptogeek @abelfotografia @cryptocubangirl
Perfecto. Es una opción muy útil.
!PIZZA
https://twitter.com/DitoFerrer/status/1506285303748874240
The rewards earned on this comment will go directly to the person sharing the post on Twitter as long as they are registered with @poshtoken. Sign up at https://hiveposh.com.
I gifted $PIZZA slices here:
ditoferrer tipped jomancub (x1)
ditoferrer tipped manuelernestogr (x1)
@ditoferrer(1/10) tipped @ibrahimc (x1)
ditoferrer tipped hivecuba (x1)
Send $PIZZA tips in Discord via tip.cc!
Muy buen post, muchas gracias por la info. Ni sabía de la existencia de esa herramienta y es súper útil.
Pues sí. Para promoción está muy buena, coges una serie de publicaciones de tu interés, creas una colección y la publicas. Te votan por ella, la promocionas en Ecency, la compartes, etc. Todo en uno. Y además, sales en la comunidad de curated Collection.
A usarla se ha dicho!
Buena característica esa de PeakD, no me la sabia. Gracias por el tuto bro 🙌
Estaba escondida a plena vista jaja. De nada Bro, dale un buen uso.
!PIZZA
Muy interesante esta opción. Voy a probar, aunque imagino que en las demás interfaces no se reflejen los cambios en la organización del blog.
!hivebits
Hivebits blends Hive's blockchain and Bitcoin's ethos. Your effort = your reward. Mine HBIT simply 1-per-day with (no space):
! hivebitsor! HBITor! hbitor$ hbit.Success! You mined .9 HBIT and the user you replied to received .1 HBIT on your behalf. You can receive 100% of the HBIT by replying to one of your own posts or comments. Or, support Hivebits at the official HBIT mine | your wallet | market | tools | connect | <><
This confirmation reply will go off when Resource Credits (RCs) get low. Yet, your hivebits command will still go through and you'll get your HBIT. :)
En Ecency no se te crea la categoría, pero como la colección es una publicación más la vas a tener siempre ahí. Lo que yo hice fue utilizar mis puntos de Ecency para promocionarla. Hasta el día de hoy aún recibo votos por ella(a pesar de que el plazo de la recompensa ya venció) Además siempre vas a aparecer en la comunidad de curated Collections.
Me cuadra el hbit ese jaja. Aquí te mando un poco de
!PIZZA
!LUV
@ditoferrer(1/1) gave you LUV. H-E tools | connect | <><
Gracias por tu aporte amigo, no sabía esta forma de organizar mis post lo pondré a prueba pronto.
Pues sí, especialmente cuando el volumen de publicaciones aumenta. Saludos
Buenísimo! Estaba buscando esta información. Muchas gracias!
Muy bien que te haya resultado útil.
!PIZZA
Amigo ya pude hacer la colección, pero los artículos siguen apareciendo en el blog junto con la colección. Sabes como hacer para que ya no aparezcan en el blog? (sino que estén organizados dentro de la colección), es eso posible?
Agradecido de antemano!
Bueno, cuando tú públicas un post tienes la opción para "también publicar en tu blog" en una casilla en la parte superior del borrador.
Si no marcas esa casilla no va para el blog. Así cuando los añadas a la colección solo estarán allí.
Recuerda que en donde sí siempre va a salir es en "all posts"
Espero te ayude.
ahhh ok... entonces lo publico en la comunidad pero no en mi blog. Pero si lo agrego a la coleccion que si están en mi blog, aparecerá allí. Perfecto, lo voy a probar, muchísimas gracias!