[ESP-ENG] Mi aeroplano Hive - My Hive airplane
Hello friends of Hive I hope you are well, today I present the design of an airplane built with recyclable materials, I called much attention to the subject of the airplane and researched on the first powered flight I hope you like it. .
The event occurred on December 17, 1903 near Kitty Hawk, North Carolina, when brothers from Dayton, Ohio, conducted the first successful powered airplane flights called the Wright Flyer. 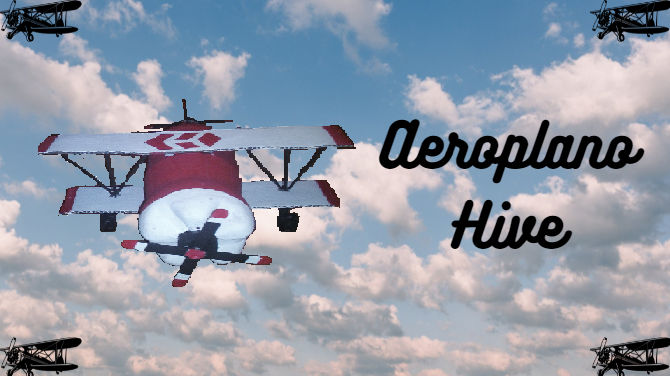


Materiales:
-Botella de gaseosa
-Pintura al frio Negro, Rojo y Blanco
-5 Tapas de gaseosas
-Tijera
-Peletas de helados
-Silicon en barra
-Regla
-Carton
-Lapiz Crayon
-Marcador
-Pinceles
-Palitos de alturaMaterials:
-Soda bottle
-Cold Paint Black, Red and White
-5 soda caps
-Scissors
-Ice cream scoops
-Silicone stick
-Ruler
-Carton
-Crayon pencil
-Marker
-Brushes
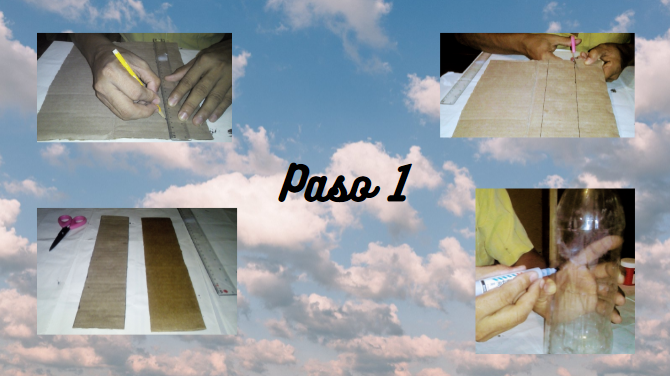
-High sticksPaso 1: Medimos y marcamos el cartón para hacer las alas su medida es 6cm de ancho por 28cm de largo luego procedemos a cortar 2 partes iguales, luego medimos la botella y marcamos una raya a la mitad de la botella tiene una medida de 30cm.
Step 1: We measure and mark the cardboard to make the wings its measure is 6cm wide by 28cm long then proceed to cut 2 equal parts, then measure the bottle and mark a line in the middle of the bottle has a measure of 30cm.
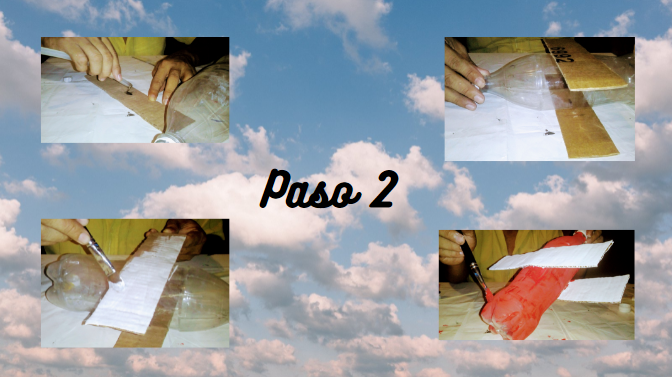
Paso 2: Procedemos a pegar las alas en el centro de la botella una en la parte de arriba y la otra en la de abajo luego de hacer ese paso pintamos las alas de blanco y la botella de rojo.
Step 2: We proceed to glue the wings in the center of the bottle, one on the top and the other on the bottom, then we paint the wings white and the bottle red.
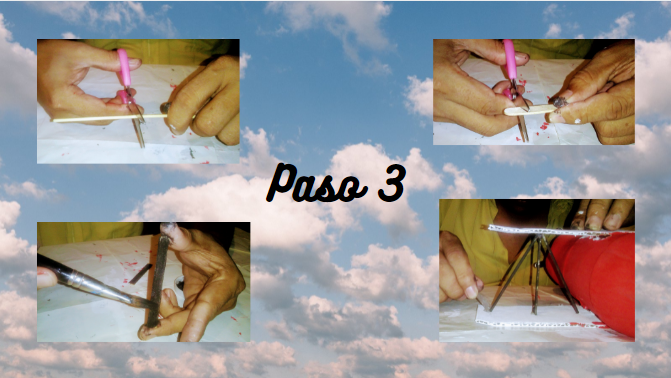
Paso 3: Cortamos 4 palitos de altura a la medida de 9cm y cortamos las puntas de 2 paletas, pintamos de negro los palitos de altura y las paletas luego procedemos a hacer el soporte pegando una paleta en el centro de las 2 alas y los palitos de altura a los lados de la paleta en forma de pirámide. Observación esto se tiene que pegar en los 2 lados del aeroplano.
Step 3: Cut 4 height sticks to the measure of 9cm and cut the tips of 2 paddles, paint the height sticks and the paddles black then proceed to make the support by gluing a paddle in the center of the 2 wings and the height sticks on the sides of the paddle in the shape of a pyramid. Note that this has to be glued on both sides of the airplane
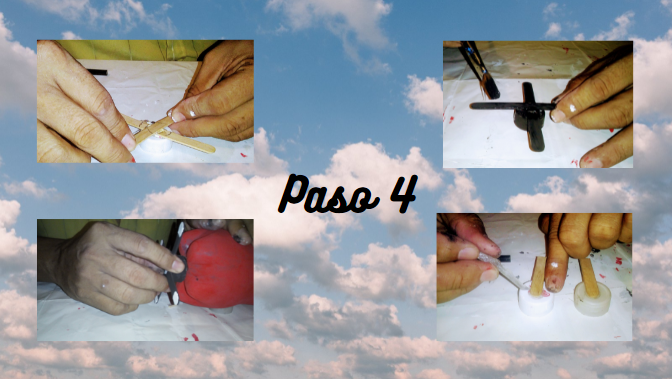
Paso 4: Pegamos 2 paletas en forma de "X" en una tapa de gaseosa, luego procedemos a pintar de color negro y las puntas blancas con rojo, luego pegamos las hélices en la parte trasera de la botella, luego hacemos 3 ruedas cortando las paletas a la mitad y pegándolas a las tapas de gaseosa.
Step 4: Glue 2 "X" shaped paddles on a soda cap, then proceed to paint black and white tips with red, then glue the propellers on the back of the bottle, then make 3 wheels by cutting the paddles in half and gluing them to the soda caps.
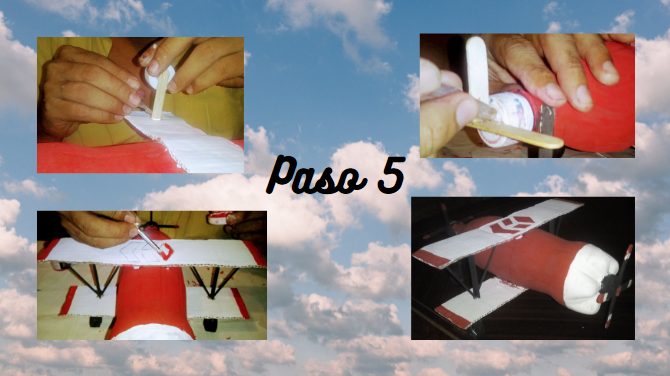
Paso 5: Pegamos las ruedas 2, debajo de las alas del aeroplano y 1 en la punta de la botella, picamos una paleta a la mitad y la pegas en medio de otra paleta para hacer la cola y la pegamos, luego procedemos a pintar el logo hive en la parte superior del aeroplano, y para los toques finales decoramos el aeroplano con lineas rojas en las puntas de las alas.
Step 5: Glue the wheels 2, under the wings of the airplane and 1 on the tip of the bottle, chop a trowel in half and paste it in the middle of another trowel to make the tail and glue it, then proceed to paint the hive logo on the top of the airplane, and for the final touches decorate the airplane with red lines on the tips of the wings.
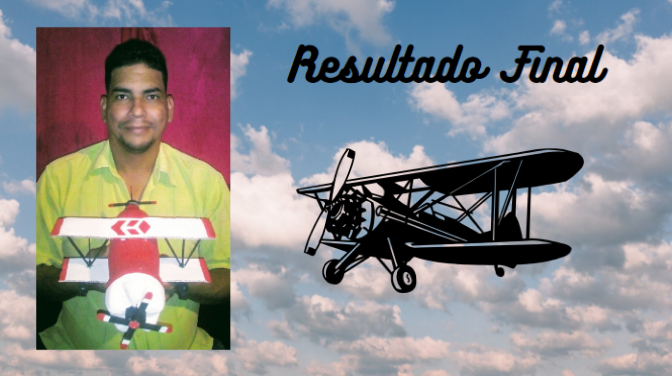
Este es mi resultado final, espero que les haya gustado. This is my final result, I hope you liked it. .

Buenas. Su post ha sido propuesto para ser votado a lo largo del día por el witness @cervantes. Un saludo
buen dia muchas gracias por tomarme en cuenta
Congratulations @elier18! You have completed the following achievement on the Hive blockchain and have been rewarded with new badge(s) :
Your next target is to reach 50 replies.
You can view your badges on your board and compare yourself to others in the Ranking
If you no longer want to receive notifications, reply to this comment with the word
STOPCheck out the last post from @hivebuzz:
Support the HiveBuzz project. Vote for our proposal!