Drawing of Nightmare (ENG/ESP)
In today's post, I wanted to share a drawing about an animatronic named Nightmare from the FNAF4 game, this character has a story based on a theory divided into two sides, where the Nightmare's animatronics are real and in another where they are not real
En el post de hoy, quise compartir un dibujo sobre un animatronico llamado Nightmare del juego FNAF4, este personaje, tiene una historia basada en una teoría dividida en dos bandos, donde los animatronicos Nightmares son reales y en otro donde no lo son
The background image is a screenshot of the game using my phone. FNAF4

Description of the drawing
I wanted to bring this digital drawing to hive, made with the Sketchbook tool, motivated by the fact that it has many details and for me, it is a challenge to try to make it look great.
I confess that it took me a long time to execute it, because its details must be done with great precision, you also have to choose the correct tones so that they give the touch I want.
It took 2 weeks between the drawing, other publications that I was doing, plus my obligations at school and home, I couldn't finish it before.
In each photo, I tell you very clearly what I was doing with you step by step, so you can observe and understand the drawing.
Translated with www.DeepL.com/Translator (free version)
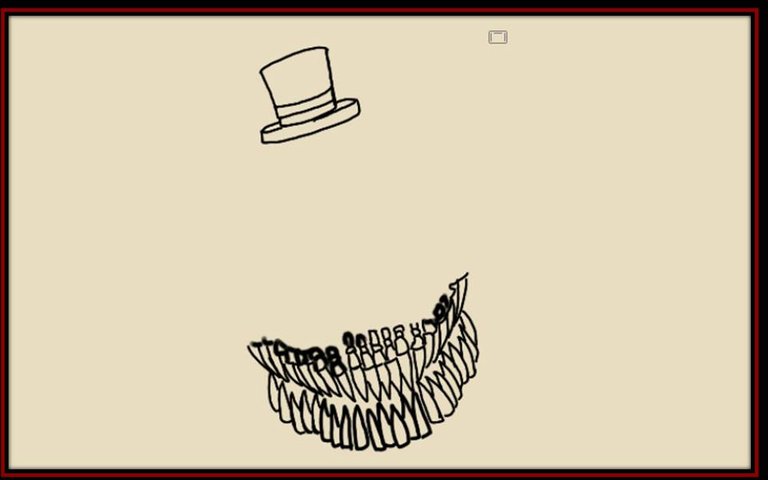
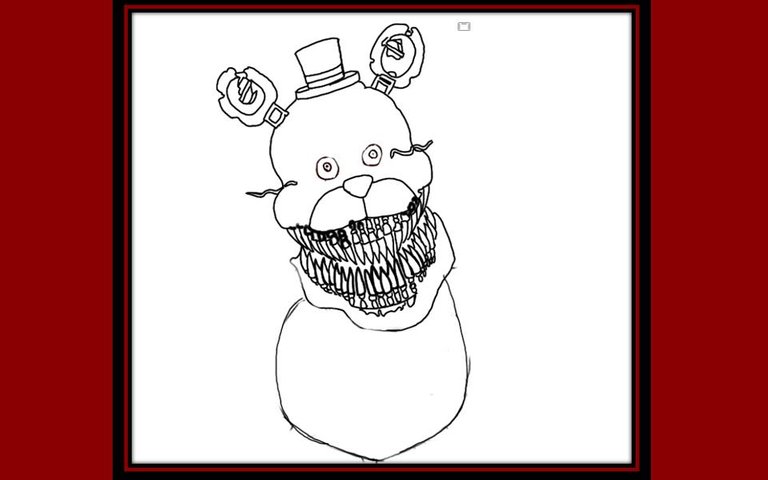
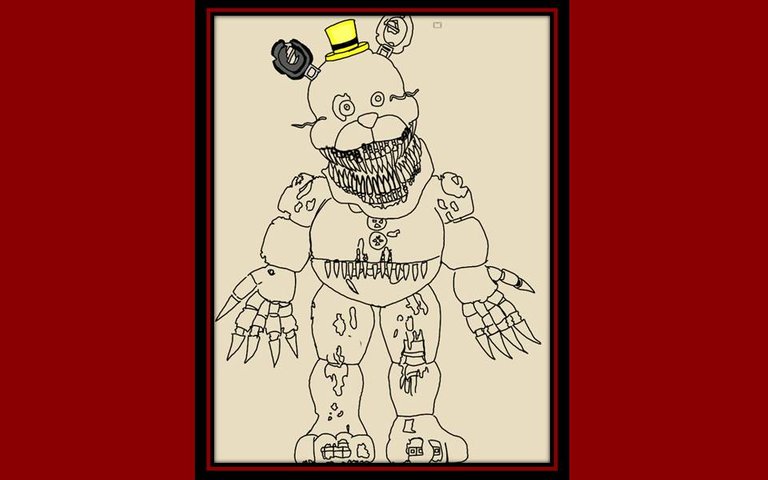
Picture 1
In the first image I started to make my drawing in a totally different way than I always do, I did not want to start with the scratches that I am used to, since I wanted my art to take shape from the beginning and this time it caught my attention do it for the hat and the sharp teeth.
I wanted the drawing of the character I chose to look as defined as possible and to be understood very quickly.
I also selected the cream color as the background, because it allows me to see the parts that are white and not be confused with the background.
Picture 2
In this part I began to make the part of the head and the ears.
Starting without a sketch of scratches because the art already takes shape from the first line, it's like drawing cleanly.
I continue with the cream background, I have not tried other backgrounds yet, it is normal for me to start with one and try several in the process until I reach the final art.
Picture 3
Here the head of my drawing is already taking its full shape as I add details.
I added the missing ear with all its details, I also made the eyes and what I think are mustaches XD.
I also placed the part of the jaw so that the face was complete.
The cream background is still present, but I already started thinking about other ideas.
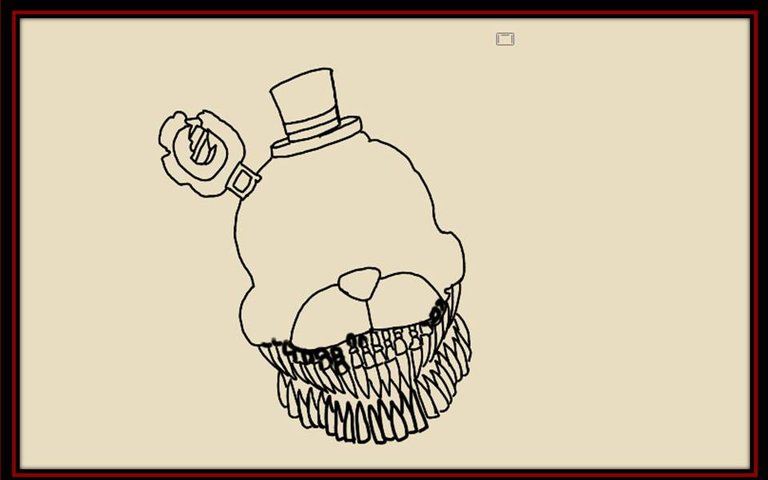
Picture 4
This time I am going to dedicate myself to giving body to the head.
Here I only made the easy part of the drawing, the belly, so until now it will be the easiest, wait to see the final result with all the details.
As you can see, I have already started to change the tones of the background, so I create ideas in my mind and then capture them in the final detail.
Picture 5
In this image, I am going to capture the extremities of the body.
Put a collage so that the post is not so long, since in this part I only dedicate myself to making arms and legs with all their details
The background is still white because I still have ideas of what to do in my head while drawing.
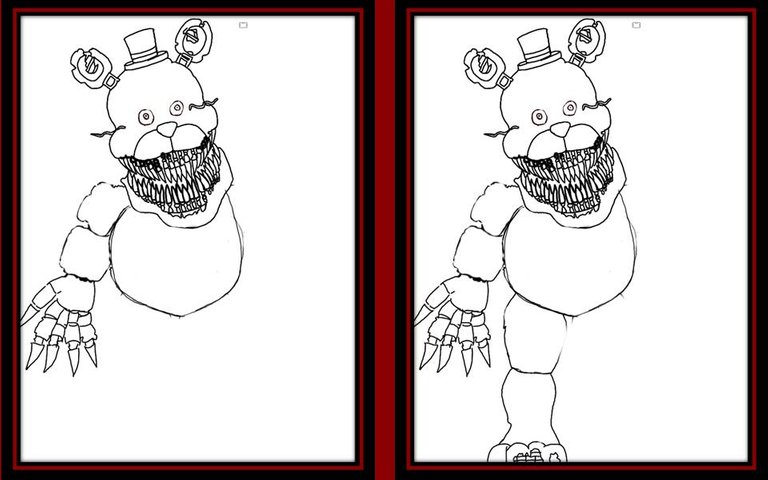
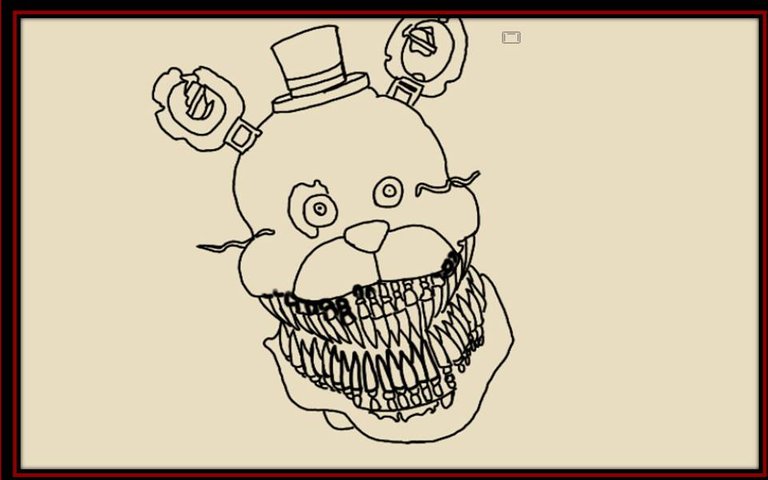
Picture 6
This character that I chose has many details regarding the suit, such as tears and other little things.
Here more scary details begin to appear in the suit, as you can see in the simple belly of the previous photo, the sharp teeth have already come out.
I've already changed the background color from white to cream again, I really like to draw with this color as a base.
Picture 7
My favorite part of the whole process began.
The beginning of painting my drawing, for me, it is very fun to do it, because I like how it begins to come to life, you just add a little color to just a small part of the drawing.
I only colored the hat and one ear, but I had to take a screenshot with just those little colored parts for you guys to appreciate how beautiful it looks with just a few drops of paint, so to speak.
The colors I used to start coloring were canary yellow for the hat and then a light yellow, to add a touch of brightness, and the ribbon in black.
On the ear I used the colors black, medium gray and light gray to give a metallic tone.
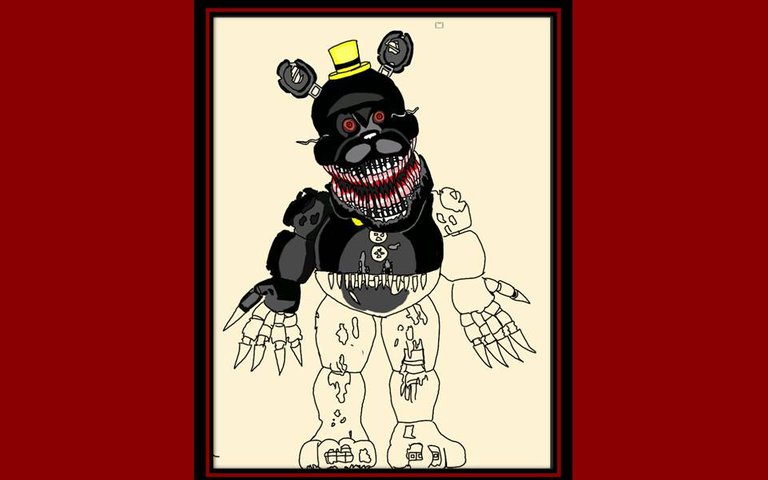
Picture 8
Continue painting with the colors already mentioned for the other ear.
For the face, I used black, which is the base color of the entire suit.
Add the details of the whole face in a darker gray tone and other light gray parts, to the nose I add the brightness with a white tone.
The teeth I added a light pink tone to the beginning of each sharp tooth to give the appearance of very old and dried blood, that is, the stained teeth.
I painted the eyes bright red, and then I added the light touch with the airbrush, my original idea was red, the eyes in the center and another gray, but I played with the tools of the application and I liked the light touch better.
Wow, believe me, that was the expression I used in my mind, when I took this screenshot of my next step.
It really looks great already, and I've only painted the head, and it doesn't even have the shadows or finishing touches.

Picture 9
I started to color the body part with its ripped details.
I put the base color black and then medium gray, and some smaller parts light gray or silver.
Here I wanted to give it my original touch creating effects with fresh blood on the teeth, since it seems darker to me that way, for that I used the red color on the tip of the teeth.
I am already more than liking what I am doing, this drawing is very elaborate and I wanted to take on that challenge.
Picture 10
In this image, I finished coloring all the part of the belly and the arms.
Then I wanted to risk the painted parts, adding the shadows and the blurs, to give this effect I used the airbrush again, which gives a good touch to make the blur effect.
I also wanted to give the same effect that I did to the teeth on the face, do it on the belly and I must say, it looks great.
I colored the claws with a very light gray tone and to give it shine I added a white line coming out from the tip, to make it a little above the middle.
Picture 11
With most of the details of blurring and shading, I continued my drawing.
Now we go for the missing parts of color, the legs, and their details.
The legs and what remains of the arms and claws.
Here again I made a collage so as not to make the publication very long and thus appreciate the process step by step.
The colors used are basically those that I have been naming, black for the base of the drawing, light and dark gray for the shadows, silver for the color of the claws with their white tone for the brightness and the airbrush for the blur effect.
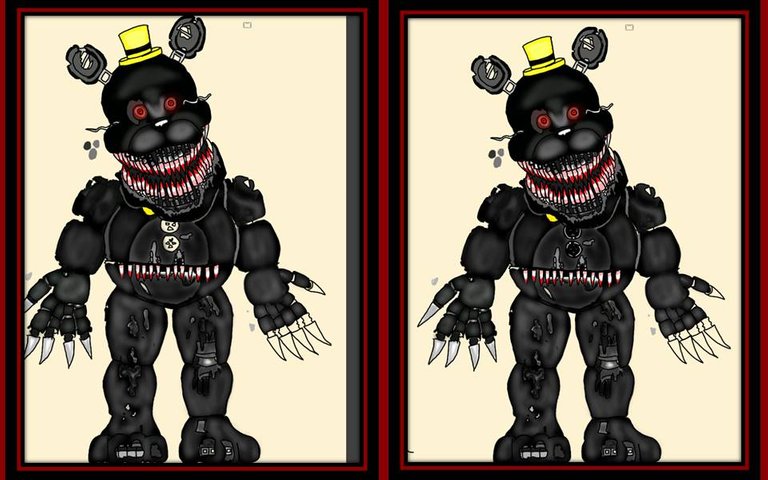
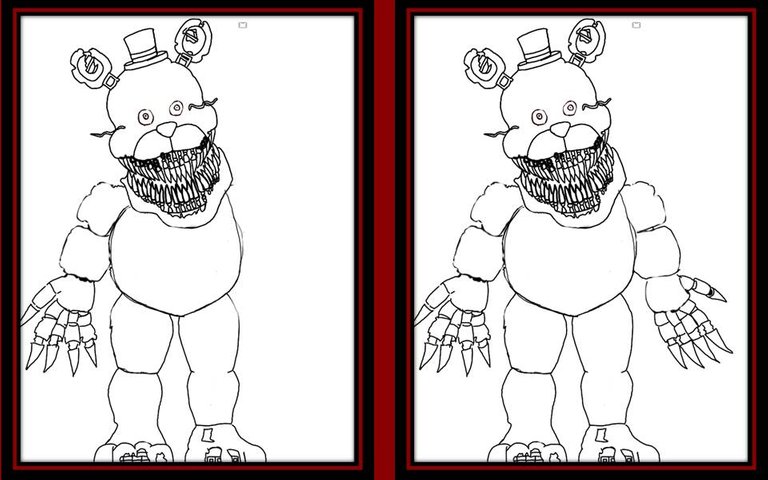
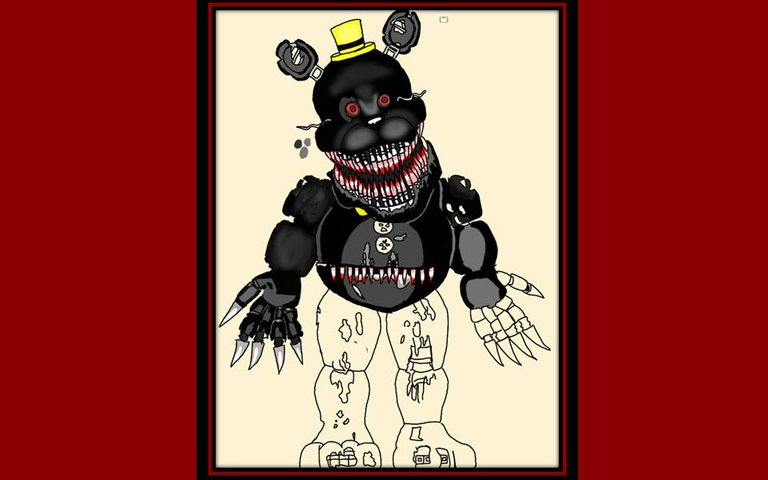
Picture 12
In this image I take the opportunity to review and finish all the final details that are missing and that is when I have already thought about whether I want to change the background or not and what to do.
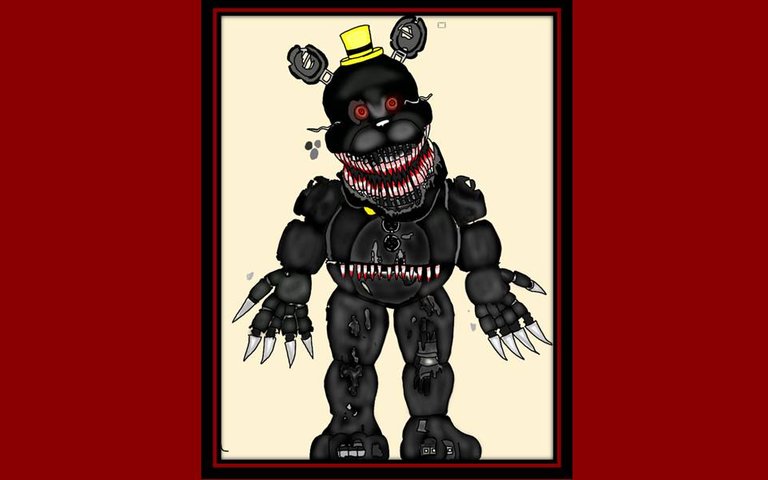
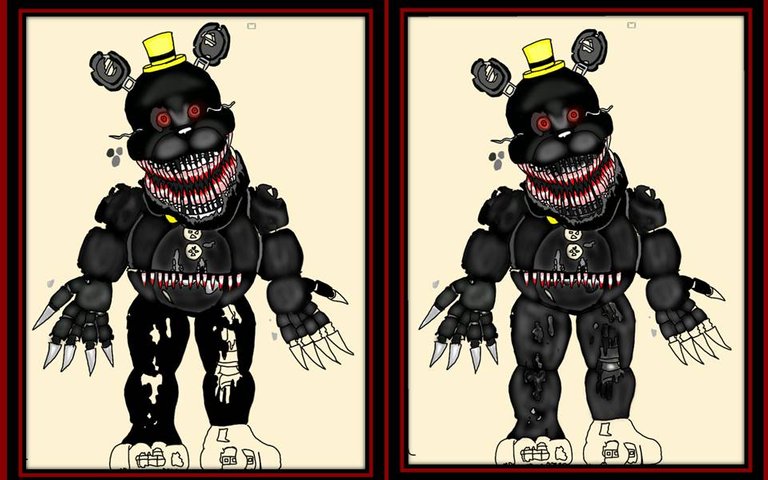
Picture 13
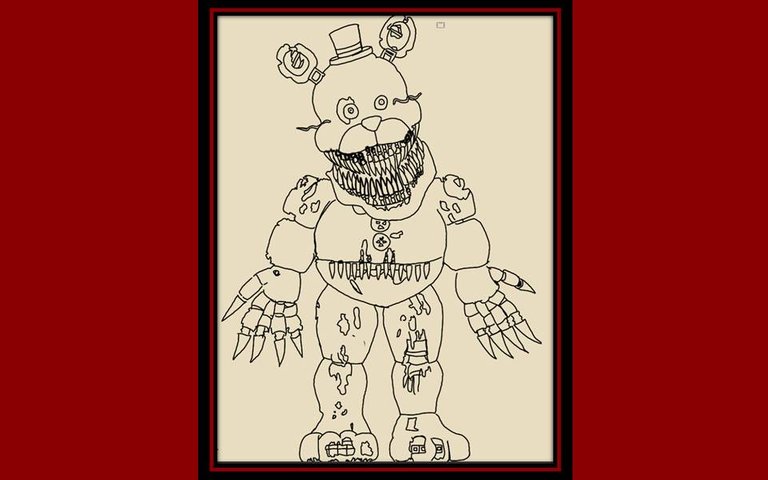
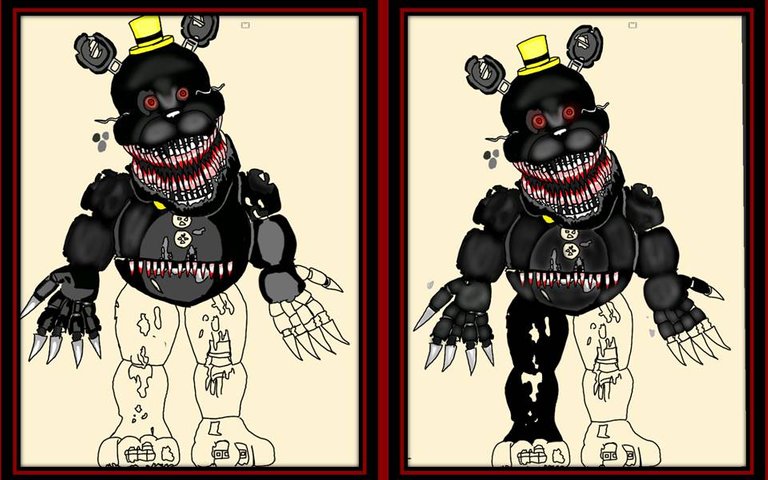
My final art, already with all its details, is the most I could do.
I made a very dark background, I black base, then I added a red color and with the airbrush I gave it a blurred touch that gives it a nightmarish look.
Well, my drawing is finished , and I like the result, I hope you like it too, I did it with great care and I dedicated myself to the details being very good and thus continue bringing quality content to this great platform and to this community @alienArtHive who has been very supportive.

Character Description
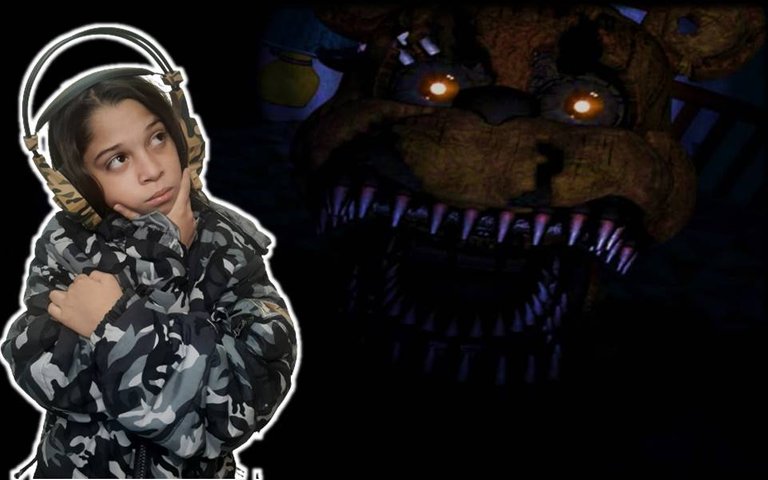
This character is from a horror game called Five Night At Freddy`s 4 (FNAF 4)
https://play.google.com/store/apps/details?id=com.scottgames.fnaf4
It is a bear-shaped animatronic that is in the nightmares of a child who was bullied by his older brother.
This game has 6 stages where you must survive several nights of each chapter, the main character of this game is Evans Afton, who is the abused child, he tries to survive his nightmares turned into 6 killer dolls.
This is a game, where you must have all your senses on alert to perform the tasks assigned on time, and thus be able to spend each night and win.
Sometimes you just have to be guided by the terrifying sounds that are stalking you.
I hope you like it and tell me about your experience.
Soon I will bring you a test of how to play for 3 speak.
Translated with www.DeepL.com/Translator (free version)
We'll read about it in a future post.
Thanks for your support
Descripción del dibujo
Quise traer este dibujo digital a hive, realizado con la herramienta Sketchbook, motivado a que tiene muchos detalles y para mí es un reto tratar que quedara muy bien.
Les confieso que para ejecutarlo me tomó muchísimo tiempo, debido a que sus detalles se deben hacer con mucha precisión, también se tienen que elegir los tonos correctos para que den el toque que quiero.
Tarde 2 semanas entre el dibujo, otras publicaciones que iba haciendo, más mis obligaciones en el colegio y el hogar, no pude terminarlo antes.
En cada foto, les cuento de manera muy clara que fui haciendo con su paso a paso y así puedan observar y entender el dibujo.
Foto 1
En la primera imagen empecé a hacer mi dibujo de una manera totalmente diferente a como siempre lo hago, no quise comenzar por los rayones que acostumbro, ya que quería que mi arte fuera agarrando forma desde el inicio y esta vez me llamó la atención hacerlo por el sombrero y los afilados dientes.
Quería que el dibujo del personaje que elegí, se viera de la manera más definida posible y que se entendiera muy rápido.
También seleccione como fondo el color crema, porque me permite ver las partes que estén en blanco y no se confunda con el fondo.
Foto 2
En esta parte empecé a efectuar la parte de la cabeza y las orejas.
Comenzar sin boceto de rayones también me gusta porque ya el arte va agarrando forma desde la primera línea, es como dibujar en limpio.
Sigo con el fondo color crema, aún no he probado otros fondos, ya es normal en mí empezar con uno y probar varios en el proceso hasta llegar al arte final.
Foto 3
Aquí la cabeza de mi dibujo ya está tomando su forma completa a medida que agrego detalles.
Le agregue la oreja faltante con todos sus detalles, también realice los ojos y lo que a mi parecer son bigotes XD.
También le coloqué la parte de la mandíbula para que la cara estuviese completa.
El fondo crema sigue estando presente, pero comencé a pensar ya en otras ideas.
Foto 4
En esta oportunidad ya me voy a dedicar a darle cuerpo a la cabeza.
Aquí solo realicé la parte fácil del dibujo, la barriga, así hasta ahora será lo más sencillo, esperen a ver el resultado final con todos los detalles.
Como pueden observar, ya empecé a cambiar los tonos del fondo, así voy creando ideas en mi mente para luego plasmarlas en el detalle final.
Foto 5
En esta imagen ya voy a plasmar las extremidades del cuerpo.
Coloque un collage para que el post no sea tan largo, ya que en esta parte solo me dedique a realizar brazos y piernas con todos sus detalles
El fondo sigue blanco porque aún sigo teniendo ideas de qué hacer en mi cabeza mientras dibujo.
Foto 6
Este personaje que elegí tiene muchos detalles con respecto al traje, como rasgaduras y otras cositas más.
Aquí ya comienzan a aparecer detalles más de miedo en el traje, como podrán ver a la simple barriga de la foto anterior, ya le salieron los filosos dientes.
Ya cambié nuevamente el color del fondo de blanco a crema otra vez, me gusta mucho dibujar con este color como base.
Foto 7
Comenzó mi parte preferida de todo el proceso.
El inicio de pintar mi dibujo, para mí es muy divertido hacerlo, porque me gusta como empieza a tomar vida, apenas le colocas un poco de color a tan solo una pequeña parte del trazado.
Únicamente coloree el sombrero y una oreja, pero tuve que tomar capture con nada más esas pequeñas partes coloreadas para que ustedes apreciaran lo bello que se ve solamente con unas gotas de pintura por así decirlo.
Los colores que utilice para empezar a colorear, fueron el amarillo canario para el sombrero y luego un amarillo claro, para realizarle un toque de brillo y la cinta en tono negro.
En la oreja usé los colores, negro, gris medio y gris claro para dar un tono metalizado.
Foto 8
Continúe con la pintura con los colores ya mencionados para la otra oreja.
Para el rostro empleé negro, que es el color base de todo el traje.
Agregue los detalles de toda la cara en un tono gris más oscuro y otras partes gris claro, a la nariz le agregue con un tono blanco el brillo.
Los dientes le añadí al inicio de cada filoso diente un tono rosado claro para dar el aspecto de sangre muy vieja y seca, es decir, los dientes manchados.
Pinte los ojos color rojo fuerte y luego le añadí el toque iluminado con el aerógrafo, mi idea original eran rojos, los ojos en centro y otro gris, pero jugué con las herramientas de la aplicación y me gusto mejor el toque iluminado.
Wow, créanme que fue la expresión que emplee en mi mente, cuando tome este capture de mi siguiente paso.
Realmente ya se ve magnífico y solamente he pintado la cabeza y ni siquiera tiene las sombras ni retoques finales.
Foto 9
Comencé a darle color a la parte del cuerpo con sus detalles de rasgaduras.
Le coloqué el color negro base y luego, gris medio, y algunas partes más pequeñas color gris claro o plata.
Aquí quise darle mi toque original creando en los dientes efectos con sangre fresca, ya que me parece más tenebroso así, para eso utilice el color rojo en la punta de los dientes.
Ya me está más que gustando lo que estoy haciendo, este dibujo es muy elaborado y quise tomar ese reto.
Foto 10
En esta imagen terminé de colorear toda la parte de la barriga y los brazos.
Luego quise arriesgarme a las partes pintadas, ir agregando las sombras y los difuminados, para dar este efecto use nuevamente el aerógrafo que da un buen toque para realizar el efecto de difuminado.
También quise darle el mismo efecto que le ejecuté a los dientes de la cara, hacerlo en la barriga y debo decir, se ve genial.
A las garras las coloree con un tono gris muy clarito y para darle brillo le agregue una línea blanca saliendo desde la punta haz un poquito más arriba de la mitad.
Foto 11
Ya con la mayoría de los detalles de difuminado y sombreado continuo mi dibujo.
Ahora vamos por las partes faltantes de color, las piernas y sus detalles.
Las piernas y lo que queda de los brazos y garras.
Aquí nuevamente procedí un collage para no hacer la publicación muy larga y así apreciar el proceso paso a paso.
Los colores utilizados son básicamente los que le he venido nombrando, negro para la base del dibujo, gris claro y oscuro para las sombras, el plateado para el color de las garras con su tono blanco para el brillo y el aerógrafo para el efecto de difuminar.
Foto 12
En esta imagen aprovecho a revisar y terminar todos los detalles finales que faltan y es cuando ya tengo pensado si quiero cambiar el fondo o no y qué hacer.
Foto 13
Mi arte final, ya con todos sus detalles es lo más que pude realizar.
Le hice un fondo muy sombrío, use negro de base, luego le añadí un color rojo y con el aerógrafo le di un toque difuminado que le da un aspecto como a pesadilla.
Buena, ya mi dibujo está terminado y me gusto el resultado, espero que a ustedes también les guste, lo hice con mucho cariño y me dedique a que los detalles fueran muy buenos y así seguir trayendo contenido de calidad a esta gran plataforma y a esta comunidad @alienArtHive que me ha apoyado mucho.
¿De qué se trata el dibujo del personaje que realice?
Descripción del personaje
Este personaje es de un juego de horror llamado Five Nigth At Freddy`s 4 (FNAF 4)
https://play.google.com/store/apps/details?id=com.scottgames.fnaf4
Es un animatronico con forma de oso que está en las pesadillas de un niño que era acosado por su hermano mayor.
Este juego tiene 6 etapas en donde debes sobrevivir varias noches de cada capítulo, el personaje principal de este juego es Evans Afton, el cual es el niño maltratado, él trata de sobrevivir a sus pesadillas convertidas en 6 muñecos asesinos.
Este es un juego, en donde debes tener todos tus sentidos en alerta para realizar las tareas encomendadas a tiempo y así poder pasar cada noche y ganar.
A veces debes guiarte tan solo por los sonidos aterradores que te van acechando.
Espero les guste y me cuenten que tal su experiencia.
Pronto les traeré una prueba de cómo se juega para 3 speak.
Gracias por ver mi post
Nos vemos cuando realice otro dibujo Chau.
Translated with DeepL Translator
Congratulations @eollarvesm! You have completed the following achievement on the Hive blockchain and have been rewarded with new badge(s):
Your next target is to reach 200 upvotes.
Your next target is to reach 100 comments.
You can view your badges on your board and compare yourself to others in the Ranking
If you no longer want to receive notifications, reply to this comment with the word
STOPTo support your work, I also upvoted your post!
Support the HiveBuzz project. Vote for our proposal!
Yay! 🤗
Your content has been boosted with Ecency Points, by @eollarvesm.
Use Ecency daily to boost your growth on platform!
Support Ecency
Vote for new Proposal
Delegate HP and earn more