Step-by-step tutorial: makeup using blue and purple [ESP//ING]
💕HOLA MI LINDA COMUNIDAD💕
💕HELLO MY BEAUTIFUL COMMUNITY💕
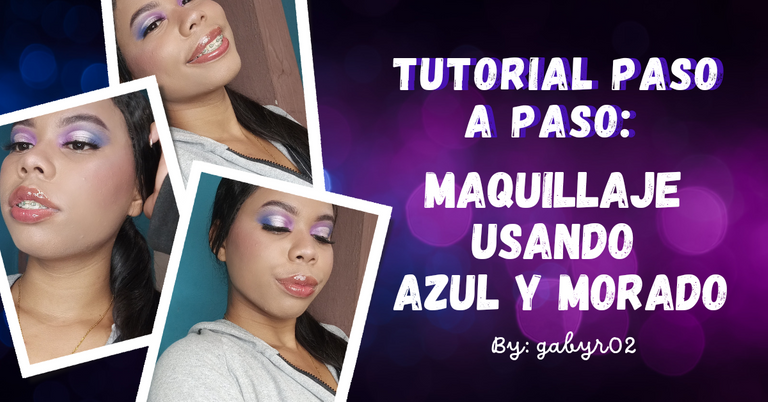
Cómo les estuvo comentando en mi post anterior, me di como meta de esta semana (puede que incluso del mes) probar con nuevos colores y técnicas de maquillaje. Se que muchos de ustedes estos looks les pareceran aburridos, pero voy tratando de salir poco a poco de mi zona de confort e intentando que me salga lo mejor posible. Por ese motivo, el día de hoy decidí probar un modelo de maquillaje diferente usando los colores azul y morado, así que, como siempre les digo: Manos a la obra
As I was telling you in my previous post, I made it my goal this week (maybe even this month) to try new colors and makeup techniques. I know that many of you may find these looks boring, but I'm trying to get out of my comfort zone and trying to do my best. For that reason, today I decided to try a different makeup model using the colors blue and purple, so, as I always say: Let's do it!
Paso a paso | Step by step
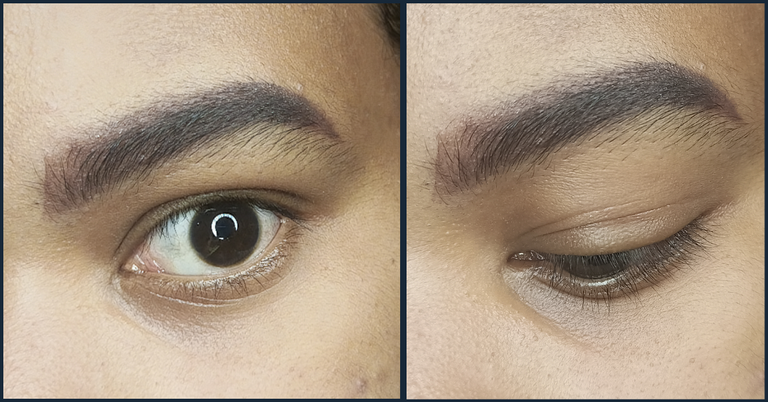
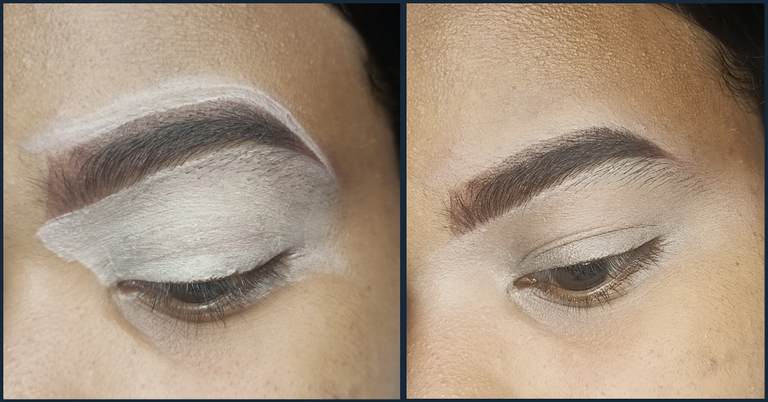
Previo a el inicio del maquillaje, lavé mi rostro, apliqué crema hidratante y contorno de ojos, así preparo mi piel para que mi maquillaje luzca mejor. Ahora bien, comenzamos haciendo nuestras cejas, rellenando los espacios que podamos tener y dándoles forma (Hago disculpa pública por mis cejas, pero luego entenderán el porqué están así de feas). Luego vamos a tomar un corrector de tono claro para resaltar la forma que le dimos a nuestra ceja, aprovecha de una vez y aplica este mismo corrector por todo el párpado, así lo prepararemos para las sombras que colocaremos en un momento.
Before starting the makeup, I washed my face, applied moisturizer and eye contour, so I prepare my skin for my makeup to look better. Now, we start by doing our eyebrows, filling in any gaps we may have and shaping them (I make public apology for my eyebrows, but then you will understand why they are this ugly). Then we are going to take a light tone concealer to highlight the shape we gave to our eyebrow, take advantage at once and apply this same concealer all over the eyelid, this way we will prepare it for the shadows we will place in a moment.
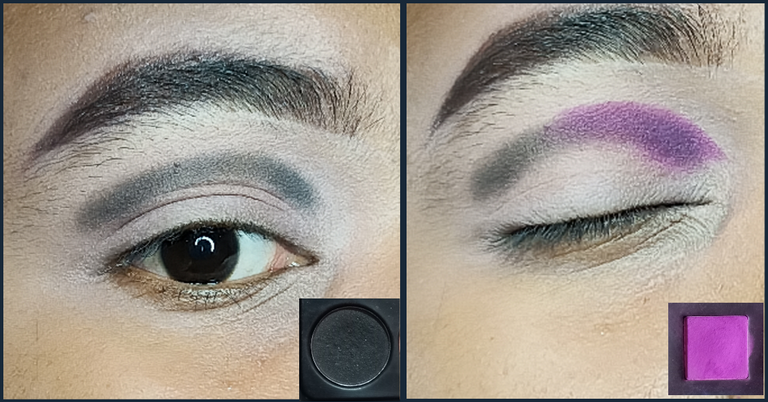
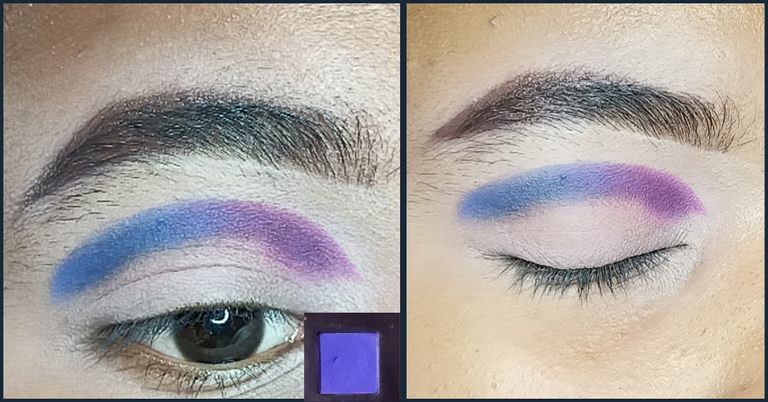
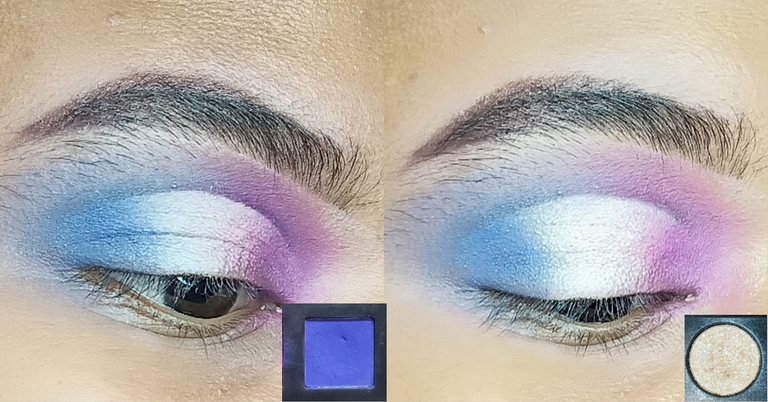
Ahora sin sellar nuestro corrector, aplicaremos una sombra negra con una brocha pequeña y haciendo una especie de arco por toda nuestra cuenca. Encima de nuestra sombra negra, aplicaremos una sombra morada, desde el inicio hasta la mitad de este arco, ésta sombra debemos aplicarla con una brocha pequeña y preferiblemente plana a toquecitos, la idea es saturar el color. Luego desde la mitad hasta el final del arco aplicaremos una sombra azul, también a toquecitos y usando una brocha plana. Aquí te dejo fotos de todas las aplicaciones y de cómo debería verse.
Now without sealing our concealer, we will apply a black shadow with a small brush and making a kind of arc all over our socket. On top of our black shadow, we will apply a purple shadow, from the beginning to the middle of this arc, this shadow should be applied with a small brush and preferably flat touches, the idea is to saturate the color. Then from the middle to the end of the arc we will apply a blue shadow, also in small touches and using a flat brush. Here are photos of all the applications and how it should look.
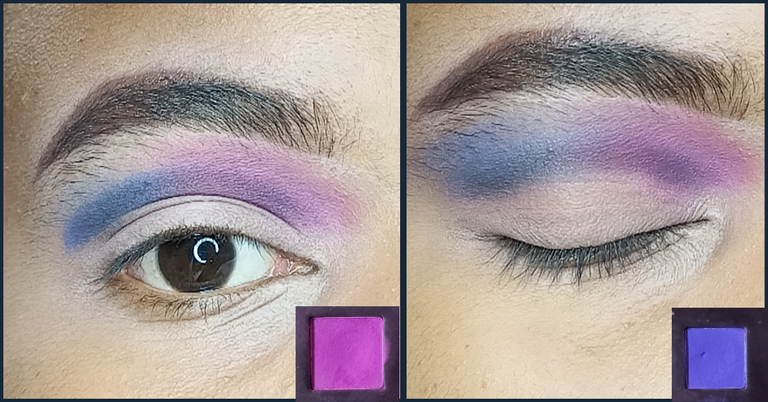
Ahora que nuestro arco está con ambos colores bien saturados, tomaremos un poco del mismo tono morado, esta vez con una brocha para difuminar y tomándo la brocha desde el extremo más lejano a la punta, comenzaremos a difuminar la parte morada de nuestro arco, la idea es ejercer la mínima presión posible y lograr un buen esfumado. Haremos el mismo procedimiento del otro lado del arco, pero usando obviamente nuestra sombra azul. Una vez conforme un nuestro difuminado, haremos un corte por toda la cuenca, desde el lagrimal hasta la esquina externa, recuerda usar un corrector líquido para que se te haga mucho más fácil.
Now that our bow is with both colors well saturated, we will take some of the same purple shade, this time with a blending brush and taking the brush from the far end to the tip, we will start blending the purple part of our bow, the idea is to exert as little pressure as possible and achieve a good blending. We will do the same procedure on the other side of the bow, but obviously using our blue shadow. Once we are satisfied with our blending, we will make a cut all over the socket, from the tear trough to the outer corner, remember to use a liquid concealer to make it much easier for you.
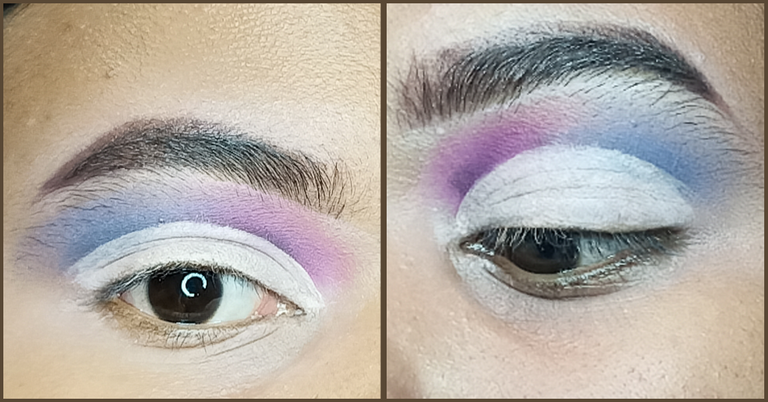
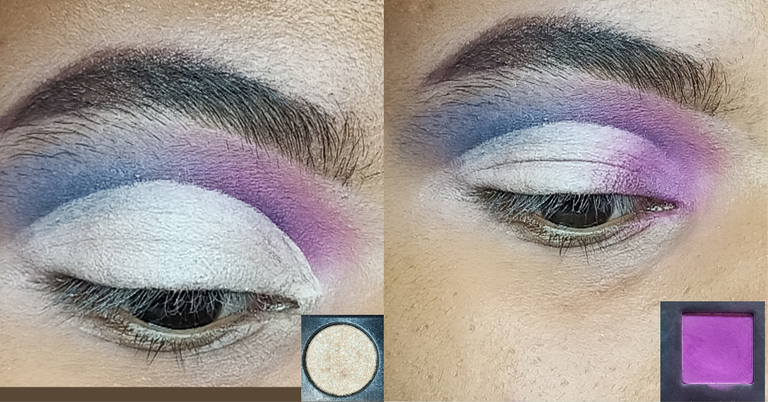
Ya que tenemos listo nuestro corte de cuenca, aplicaremos en todo el centro una sombra shimmer (brillante) color champagne o beige claro (como quieras decirle). Luego tomaremos un poco de nuestro morado y lo aplicaremos en el lagrimal hasta llegar al sitio donde está el champagne, trata de que no exista una línea entre ambos tonos. Ahora tomaremos nuestro azul y lo colocaremos en la esquina externa del ojo, recuerda aquí también difuminar bien la línea entre el champagne y el azul. Luego si es necesario (como en mi caso) coloca un poco más del champagne en el centro para reforzar el color. Se que la explicación fue un poco encogorrosa, así que igual te dejaré las fotos de cada paso para que quede un poco más claro.
Once we have our socket cut ready, we will apply a champagne or light beige (whatever you want to call it) shimmer shadow all over the center of the eye socket. Then we will take a bit of our purple and apply it on the tear trough until we reach the place where the champagne is, try not to have a line between both shades. Now we will take our blue and place it on the outer corner of the eye, remember here also to blend well the line between the champagne and the blue. Then if necessary (as in my case) place a little more of the champagne in the center to reinforce the color. I know that the explanation was a little shrinky, so I'll still leave you the pictures of each step to make it a little clearer.
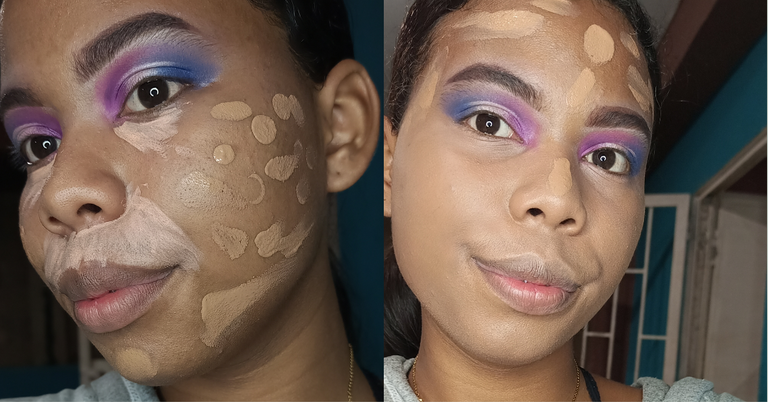
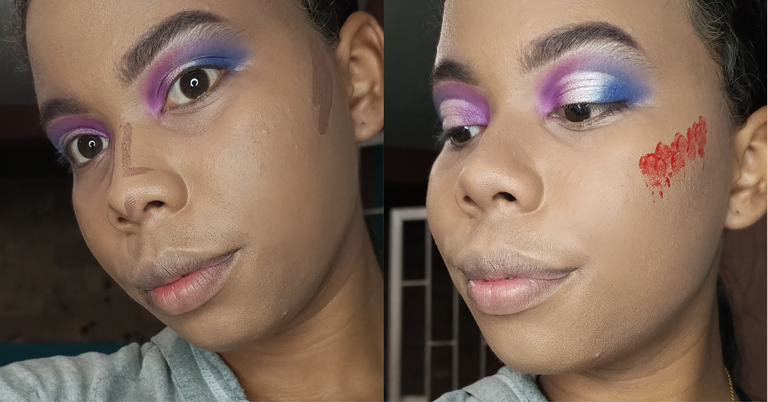
Ahora que nuestros ojos estan listos, maquillo mi piel. Corrijo mis zonas problemáticas usando un corrector naranja y aplico mi base en el resto del rostro para unificar el tono de mi piel. Luego hago mi contorno y aplico una tinta de labios para reemplazar mi rubor. Sellé todo con productos en polvo y listo. Solo queda de tu parte el labial del tono que desees usar y colocar pestañas o rimel... Eso como dije, lo decides tú🥰
Now that our eyes are ready, I do my skin makeup. I correct my problem areas using an orange concealer and apply my foundation on the rest of my face to even out my skin tone. Then I do my contouring and apply a lip tint to replace my blush. I sealed everything with powder products and that's it. All that's left is for you to apply the lipstick in the shade you want to use and apply lashes or mascara.... That's like I said, it's up to you🥰
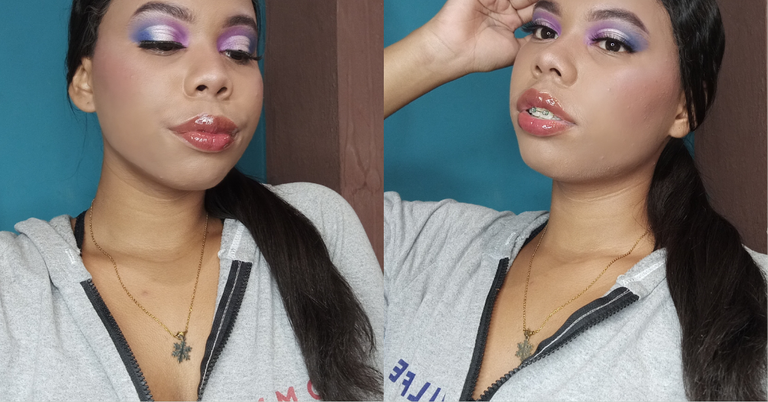
Fotos finales | Final photos
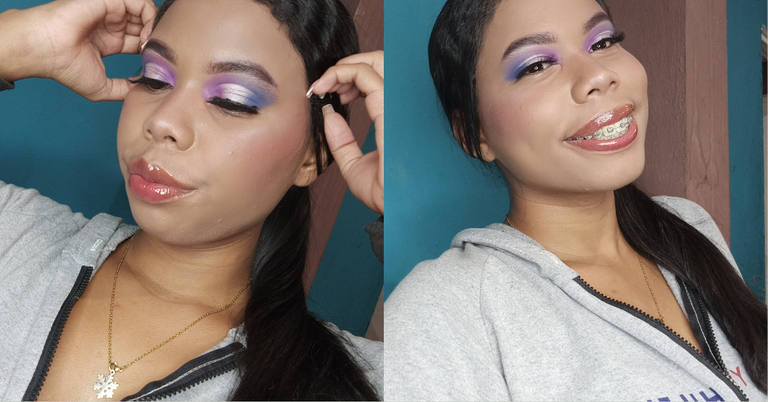
Sin más que agregar, esta fue mi propuesta de un maquillaje usando azul y morado, espero que el resultado les haya gustado tanto como a mí. Aunque, tengo que confesarles que me siento muy sorprendida por lo bien que quedó, cómo les dije estos colores no son mi fuerte, pero ame con todo mi corazón el resultado final y me siento súper orgullosa de él. ¿Y tú? ¿Probarias está propuesta?. Si llegaste hasta aquí:
Without more to add, this was my proposal for a makeup using blue and purple, I hope you liked the result as much as I did. Although, I have to confess that I feel very surprised by how well it turned out, as I told you these colors are not my forte, but I loved with all my heart the final result and I feel very proud of it. And you, would you try this proposal? If you made it this far:
Gracias por leerme y hasta un próximo post
Thanks for reading and see you in a future post
Traducción: Deepl. // Traslation: Deepl.

0
0
0.000
0 comments