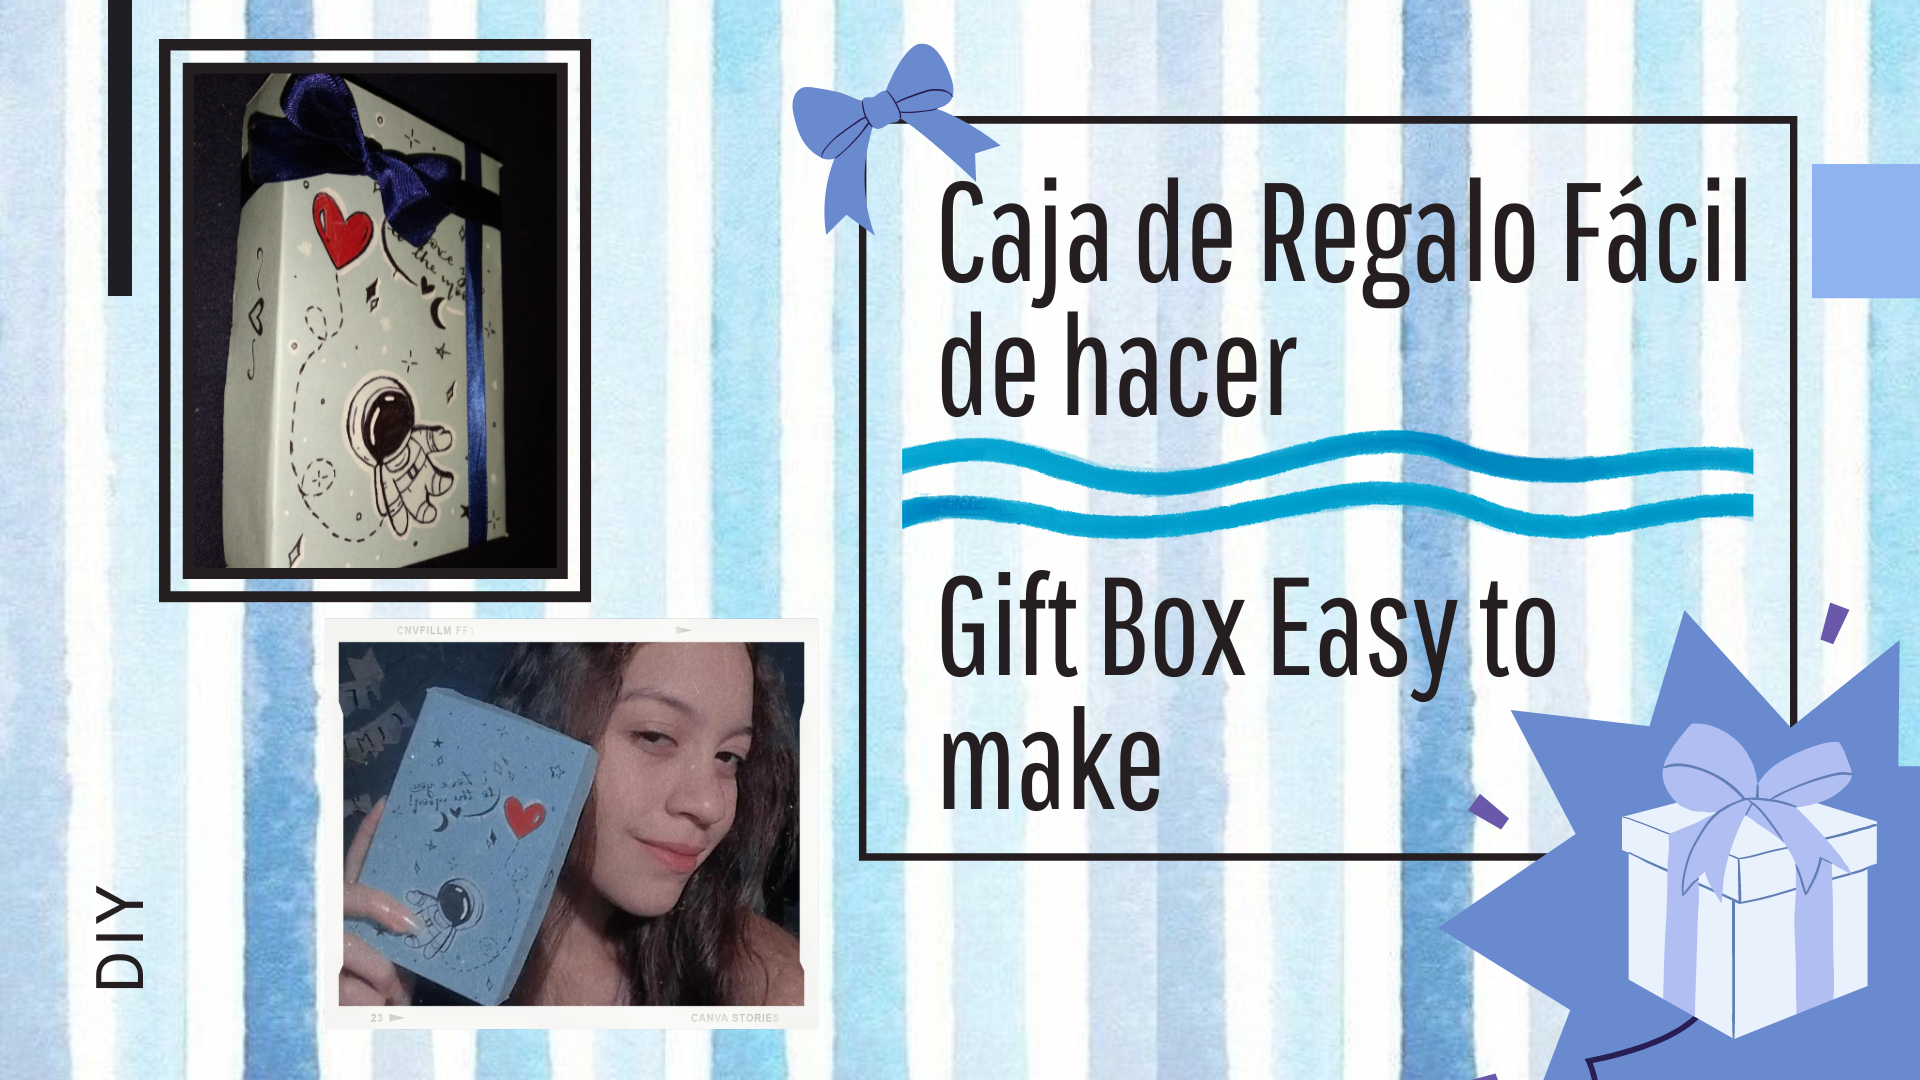
[ESP-ENG] DIY Caja de Regalo paso a paso - ¡Hazla Fácil y Rápido! ♡🎁 DIY Gift Box step by step - Make it Quick and Easy! 💝✨
¡Hola, holaaa! Les deseo un buen día, tarde u noche, variando desde dónde y cuándo estén leyendo este post, de corazón espero que este mes este lleno de muchas bendiciones y cosas buenas para todos. Empezando con mi primer DIY de este mes, con mucha actitud y entusiasmo, así es.♡
Hello, helloaa! I wish you a good day, afternoon or evening, varying from where and when you are reading this post, from the bottom of my heart I hope this month is filled with many blessings and good things for everyone. Starting with my first DIY this month, with lots of attitude and enthusiasm, that's right.♡
Les traigo un maravilloso DIY, de cómo hacer una caja de cartulina de cualquier tamaño a nuestra elección, muy fácil y lo mejor de todo, es que nos puede sacar de apuros en muchas ocasiones distintas. Y como siempre digo, lo mejor de hacerlas nosotros mismos, es que la podemos personalizar como mejor nos parezca, todo a nuestra manera, para mí, ciertamente es la mejor parte, agregar ese toque personal a cada cosa.♡
I bring you a wonderful DIY, how to make a cardboard box of any size of our choice, very easy and best of all, is that it can get us out of trouble on many different occasions. And as I always say, the best thing about making them ourselves, is that we can customize it as we see fit, all in our own way, for me, that's certainly the best part, adding that personal touch to everything.♡

Para esta manualidad solo necesitamos:
For this craft we only need:
- Cartulina
- Marcadores
- Colores
- Pega blanca o silicón
- Demás cosas para decorar
- Cardboard
- markers
- Colors
- White glue or silicone
- Other things to decorate
Paso a paso:
Step by step:
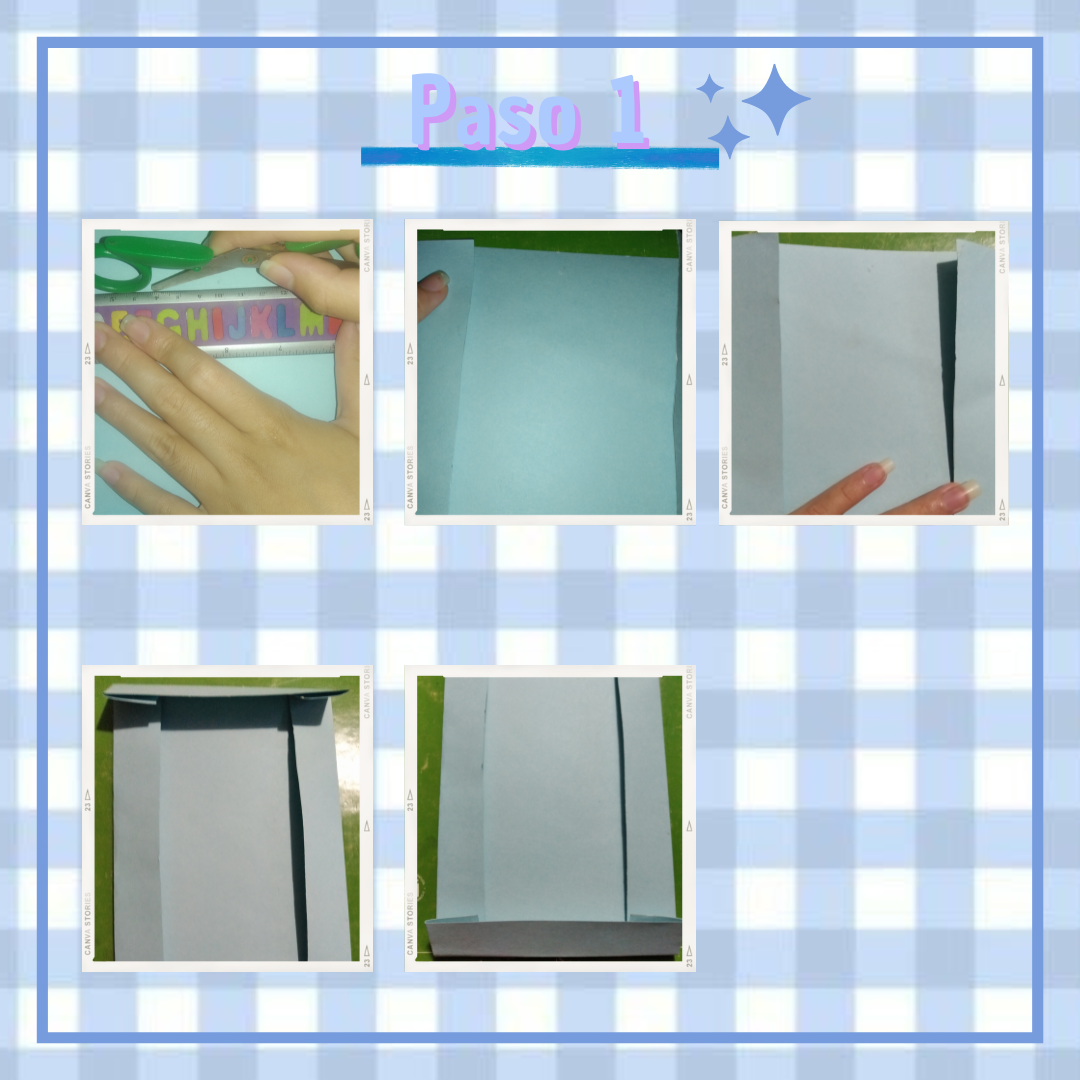
Paso 1:
Step 1:
Cómo ya les mencioné, se puede hacer con una cartulina de cualquier tamaño y de el color de nuestra preferencia, así mismo, vamos a comenzar a hacer todos los dobleces de la parte de arriba, abajo y ambos lados, percatando que tengan la misma medida, nuevamente la que queramos, yo en este caso la elegí de 3 cm de grosor cada uno, procedí a marcar ciertos puntos de cada lado con lápiz y luego marque con la punta de una tijera estás líneas, haciendo de esta manera los doblez, así mismo con la parte de arriba y abajo.
As I mentioned, it can be made with a cardboard of any size and the color of our preference, likewise, we will begin to make all the folds of the top, bottom and both sides, making sure they have the same size, again the one we want, in this case I chose 3 cm thick each, I proceeded to mark certain points on each side with a pencil and then mark with the tip of a scissors these lines, thus making the folds, likewise with the top and bottom.
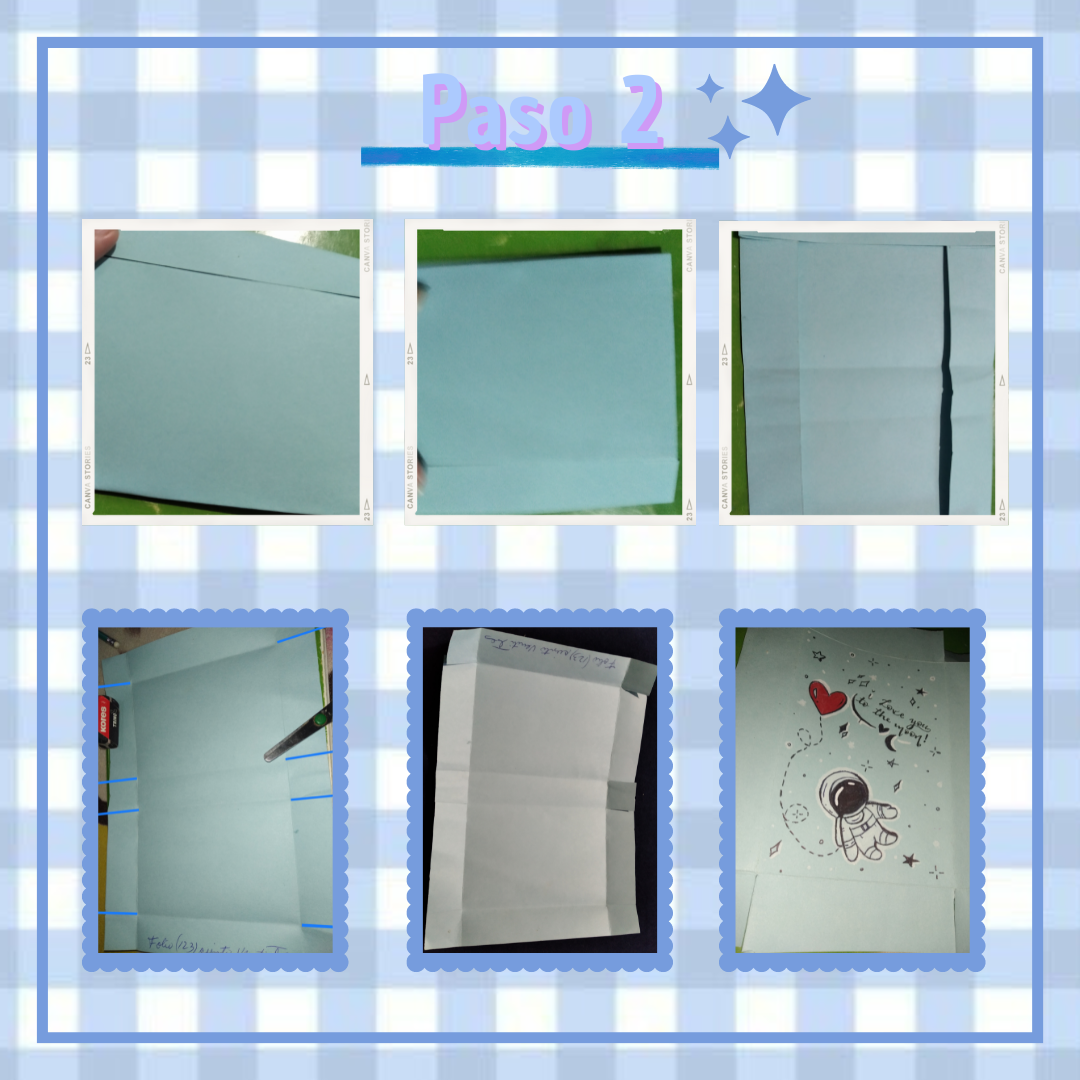
Paso 2:
Step 2:
Ahora bien, vamos a llevar un extremo justo antes del doblez de 3 cm, y repetiremos lo mismo con el otro, logrando marcar otro doblez al centro, teniendo ya estos dobleces, al abrir la cartulina está marcada nuestra guía, dónde vamos a recortar los puntos exactos dónde se muestra, obviamente de ambos lados. Ya teniendo esta parte lista, proseguimos a decorar nuestra tapa y/o alrededores a nuestra elección, antes de pegarla para que se nos haga más cómodo, yo utilicé marcadores, lapicero y colores, de todo un poco para variar y dar mi toque.
Now, we will take one end just before the fold of 3 cm, and repeat the same with the other, making another fold in the center, having already these folds, when we open the cardboard is marked our guide, where we will cut the exact points where it is shown, obviously on both sides. Having this part ready, we proceed to decorate our cover and/or surroundings as we choose, before gluing it to make it more comfortable, I used markers, pencil and colors, a little bit of everything to vary and give my touch.
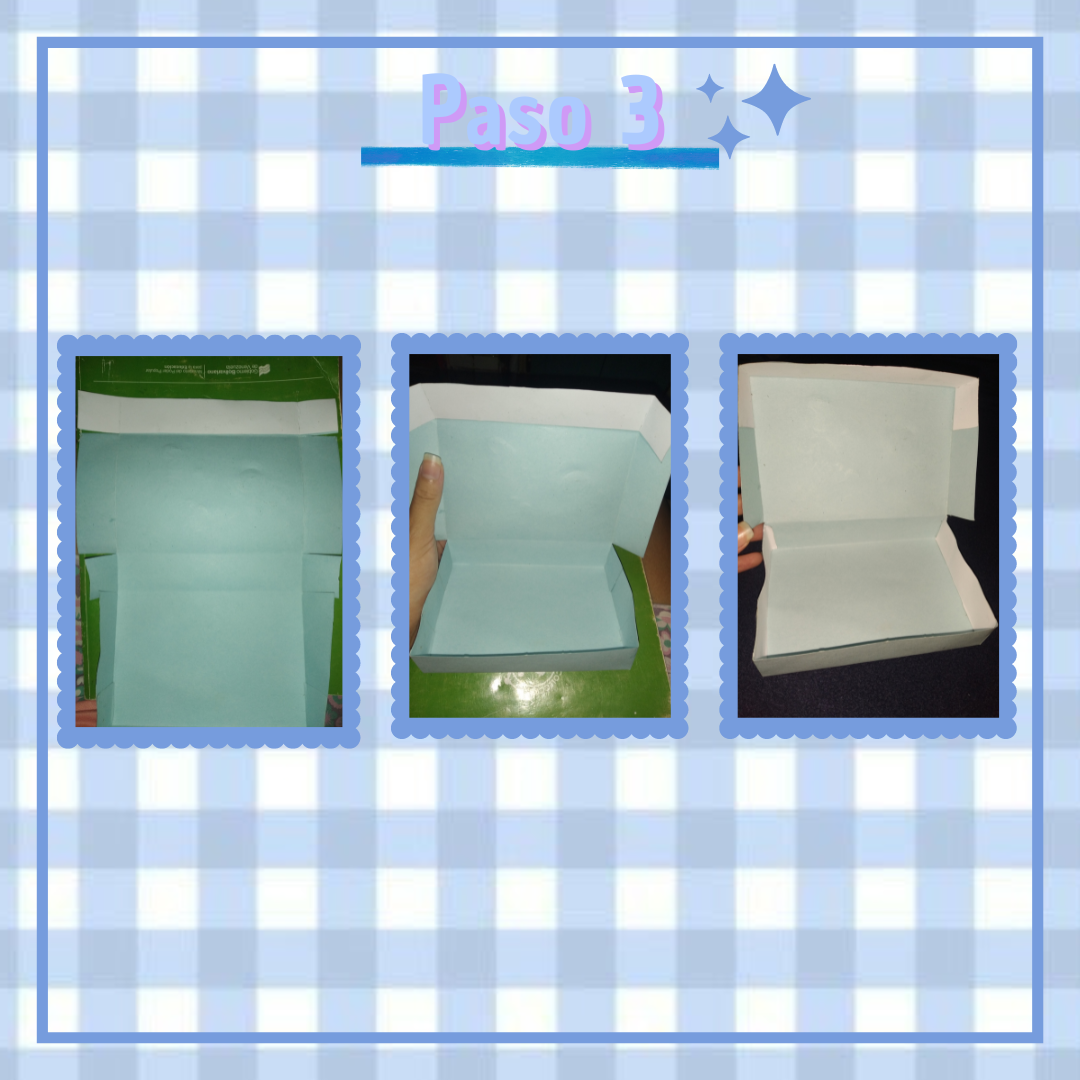
Paso 3:
Step 3:
Cómo tercer y último paso, pegue la parte de abajo que vendría siendo la caja, y seguidamente, la tapa, cabe señalar que forre por dentro algunos espacios con cartulina blanca, para perfeccionar estos y dar mejor aspecto a está, lo acomodé a mi gusto, ya depende de ustedes y como la quieran decorar y mejorar.
As the third and last step, I glued the bottom part which would be the box, and then the lid, it should be noted that I lined inside some spaces with white cardboard, to perfect these and give a better look to this, I accommodated it to my taste, it is up to you and how you want to decorate and improve it.
Y así de fácil tendríamos nuestra caja ya hecha y lista para usar u obsequiar, fácil y rápido, no tiene nada de difícil, estoy segura que si la tienen presente los sacará de unos cuántos apuros, sin duda es útil y eficiente, cumple excelente su función y lo mejor es que es hecha con nuestra creatividad y amor.
And just like that we would have our box already made and ready to use or give as a gift, easy and fast, there is nothing difficult about it, I am sure that if you have it present it will get you out of a few troubles, it is certainly useful and efficient, it fulfills its function excellently and the best thing is that it is made with our creativity and love.
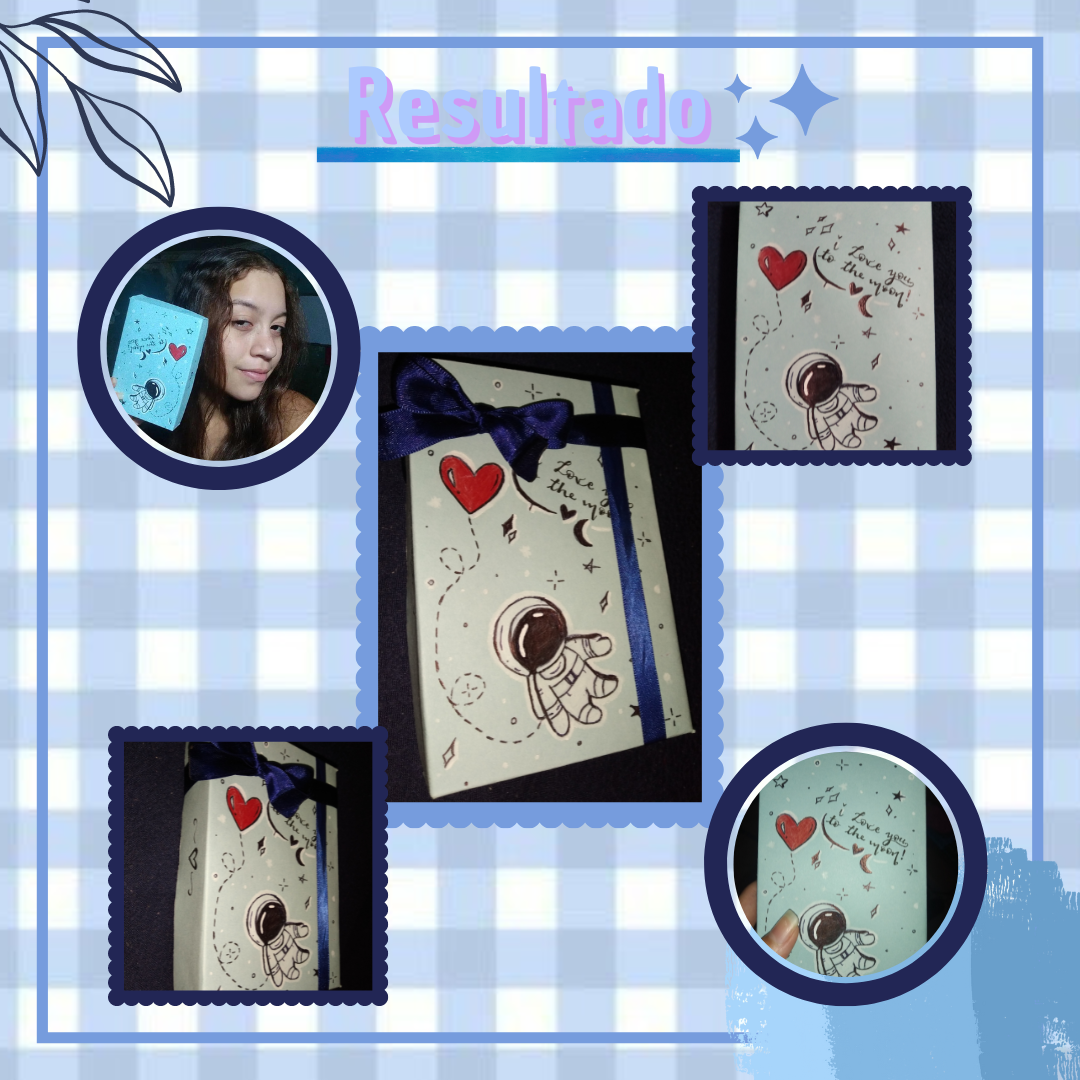
Para dar ese toque característico, hice un dibujo de un astronauta y le agregué otros detalles, me gustó mucho, asemeja a la galaxia, me gustan las estrellas y demás cosas, así también agregué una frase en inglés muy encantadora que traducida dice: "'Te Amo hasta la luna", disfrute hacerla a mi gustó y me alegra saber que se la daré a alguien que le gustará tanto como a mí. Nada mejor que obsequiar algo hecho a mano con mucho amor y cuidado, para finalizar agregué el regalo y le hice un lazo con cinta ¡Se ve encantador! Sin duda alguna.
To give that characteristic touch, I made a drawing of an astronaut and added other details, I liked it very much, it resembles the galaxy, I like stars and other things, I also added a very charming phrase in English that translated says: "'I love you to the moon", I enjoyed making it to my liking and I'm glad to know that I will give it to someone who will like it as much as I do. Nothing better than giving something handmade with lots of love and care, to finish I added the gift and made a ribbon bow. It looks lovely! No doubt about it.
Espero les haya gustado este pequeño DIY, me despido con un abrazo para todos, nos leemos pronto por acá.♡
I hope you liked this little DIY, I say goodbye with a hug for everyone, see you soon here ♡.
¡Gracias por su atención y por llegar hasta aquí! Hasta la próxima.♡
Thank you for your attention and making it this far! See you next time.♡
Photos of my authorship taken from my Xiaomi Redmi phone, edited in the free version of Canva.
Que bonito resultado. Me encanto la combinacion De colores!
¡Muchas gracias! Saludos ✨💙
Hola, muy bien diseñada, me gusto el paso a paso. Quedo bonita.
Holaa querída, me alegra que te haya gustado, gracias por tu apreciación.💗