[ESP-ENG] Diy Cómo hacer un Mini Paraguas de Papel ✨♡☂️ | Diy How to make a Mini Paper Umbrella 🖇️🌂
Hello, a big hello to all the beautiful community of HiveDiy! It's an honor to be around as usual, for me it's wonderful to be able to share with you a little bit of the crafts and DIY I usually do around here, it fills my soul to see so many nice comments and all your support, I love this place, thank you all for stopping by to read my post for a moment.♡

Primeramente cabe destacar que me gustan las cosas mini, es decir, me refiero a las cosas de tamaños reales adaptadas a un tamaño mucho menor al que suele ser, espero explicarme bien JAJAJS, verdaderamente soy amante de esto, y siento que en decoración quedan divinas, me declaró flechada por estás cositas, le dan un toque muy bonito a varios espacios, un escritorio, por ejemplo, ¿Alguno comparte el mismo interés?. Ahora bien les cuento esto porque en esta ocasión, les mostraré el paso a paso, de cómo realicé un paraguas ( o sombrilla) hecho de papel ¡Sí, un mini paraguas! Una amiga me enseñó a hacerlo y no podía esperar para compartirles cómo lo hice, siento que como adorno en un escritorio o en una mesa quedaría perfecto, luego veré dónde lo pongo, quiero hacer muchos más, ¡me encantó! Así que sin más preámbulos, aquí les voy con lo que necesite y lo que hice.♡
First of all it is worth mentioning that I like mini things, that is, I mean things of real size adapted to a much smaller size than it usually is, I hope I explain myself well JAJAJS, I am truly a lover of this, and I feel that in decoration they are divine, I declared myself charmed by these little things, they give a very nice touch to several spaces, a desk, for example, do any of you share the same interest? Now I tell you this because this time, I will show you step by step, how I made an umbrella (or umbrella) made of paper Yes, a mini umbrella! A friend of mine taught me how to make it and I couldn't wait to share with you how I did it, I feel that as an ornament on a desk or a table it would look perfect, then I will see where I put it, I want to make many more, I loved it! So without further ado, here I go with what I need and what I did.♡
Los materiales son muy sencillos y fáciles de conseguir en casa, solo necesitamos:
The materials are very simple and easy to obtain at home, we only need:
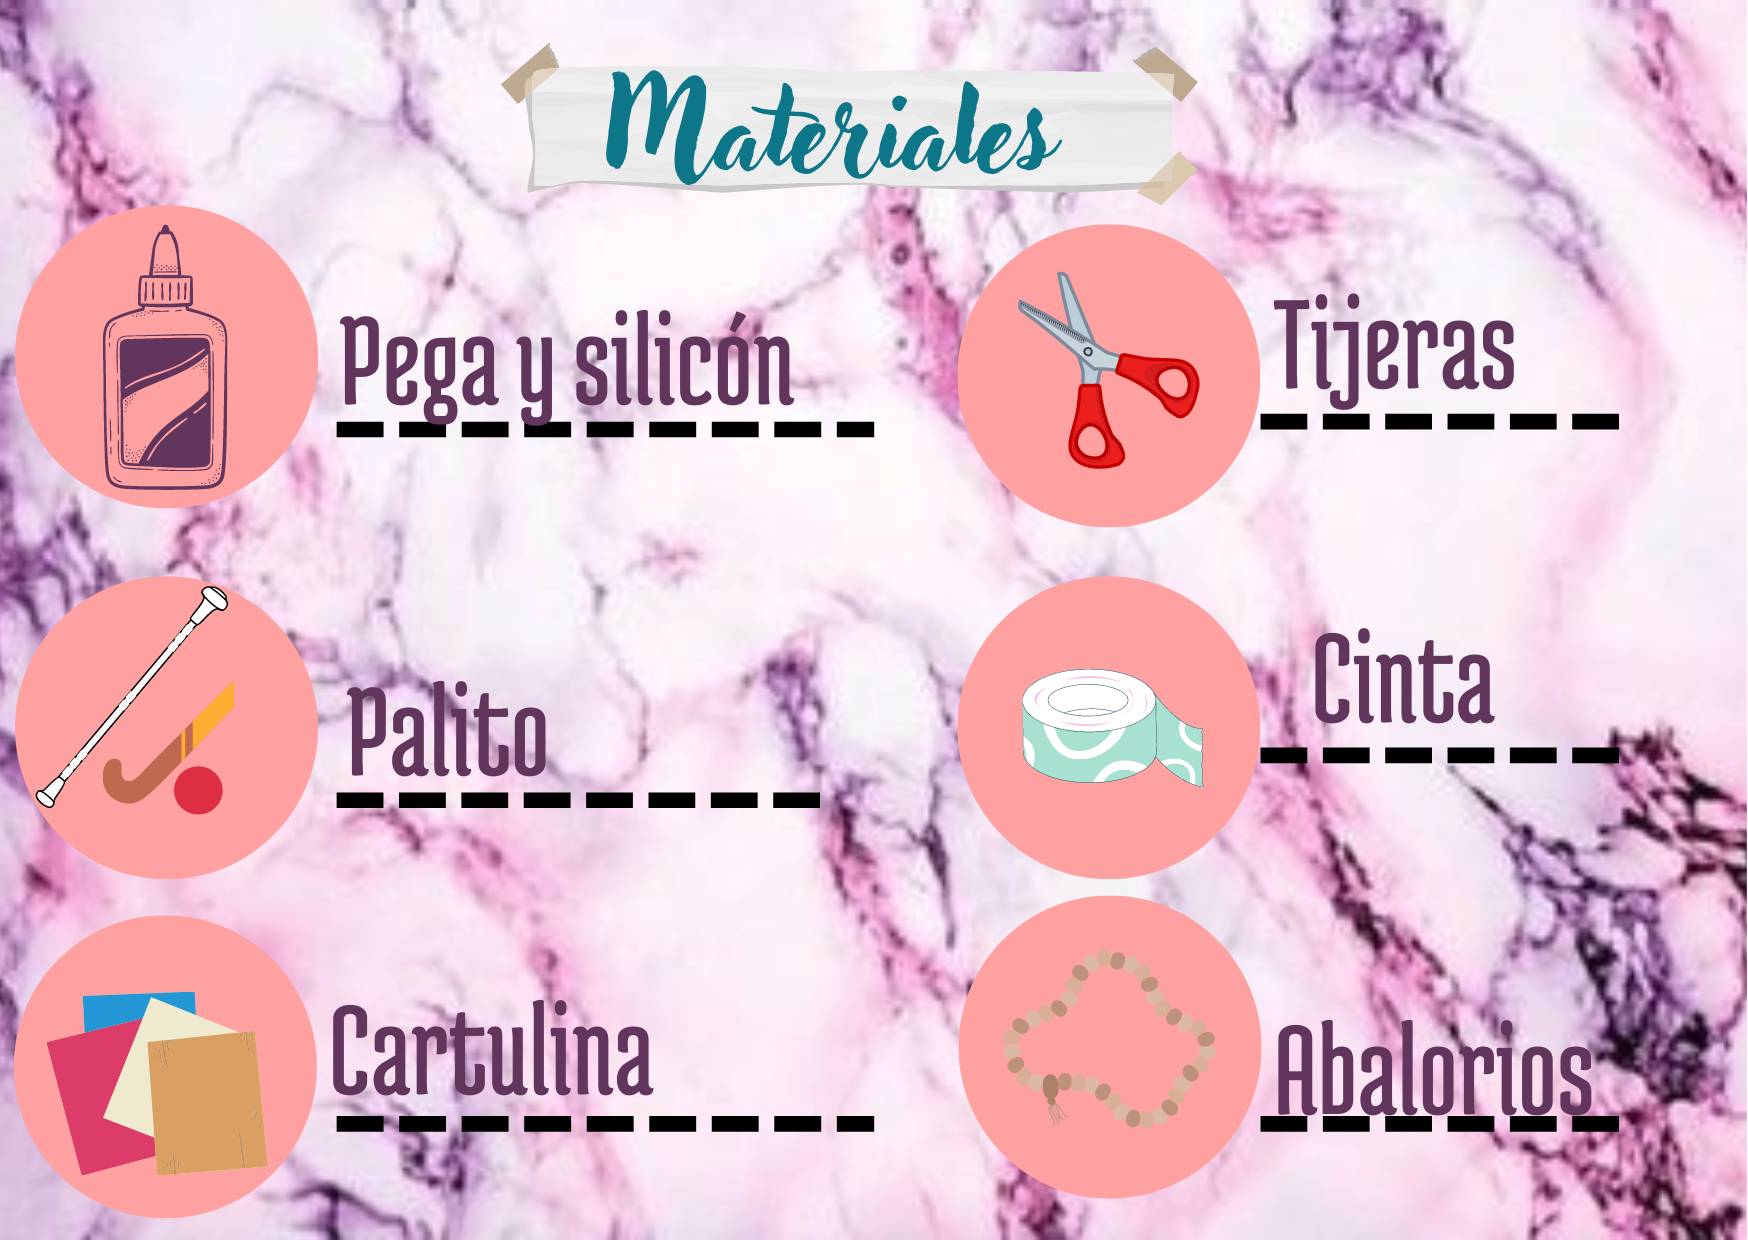
- Cartulina (o papel de nuestra preferencia)
- Pega Blanca
- Tijeras
- Solo un poco de silicón
- Algún palito, de chupeta, palillo de altura, entre otros
- Abalorios, cinta decorativa, y demás cosas a su elección.
- Cardboard (or paper of our preference)
- White glue
- Scissors
- Just a bit of silicone
- Some sticks, lollipop sticks, toothpicks, among others.
- Beads, decorative ribbon, and other things of your choice.
A continuación damas y caballeros, el paso a paso:
Ladies and gentlemen, here is the step-by-step:
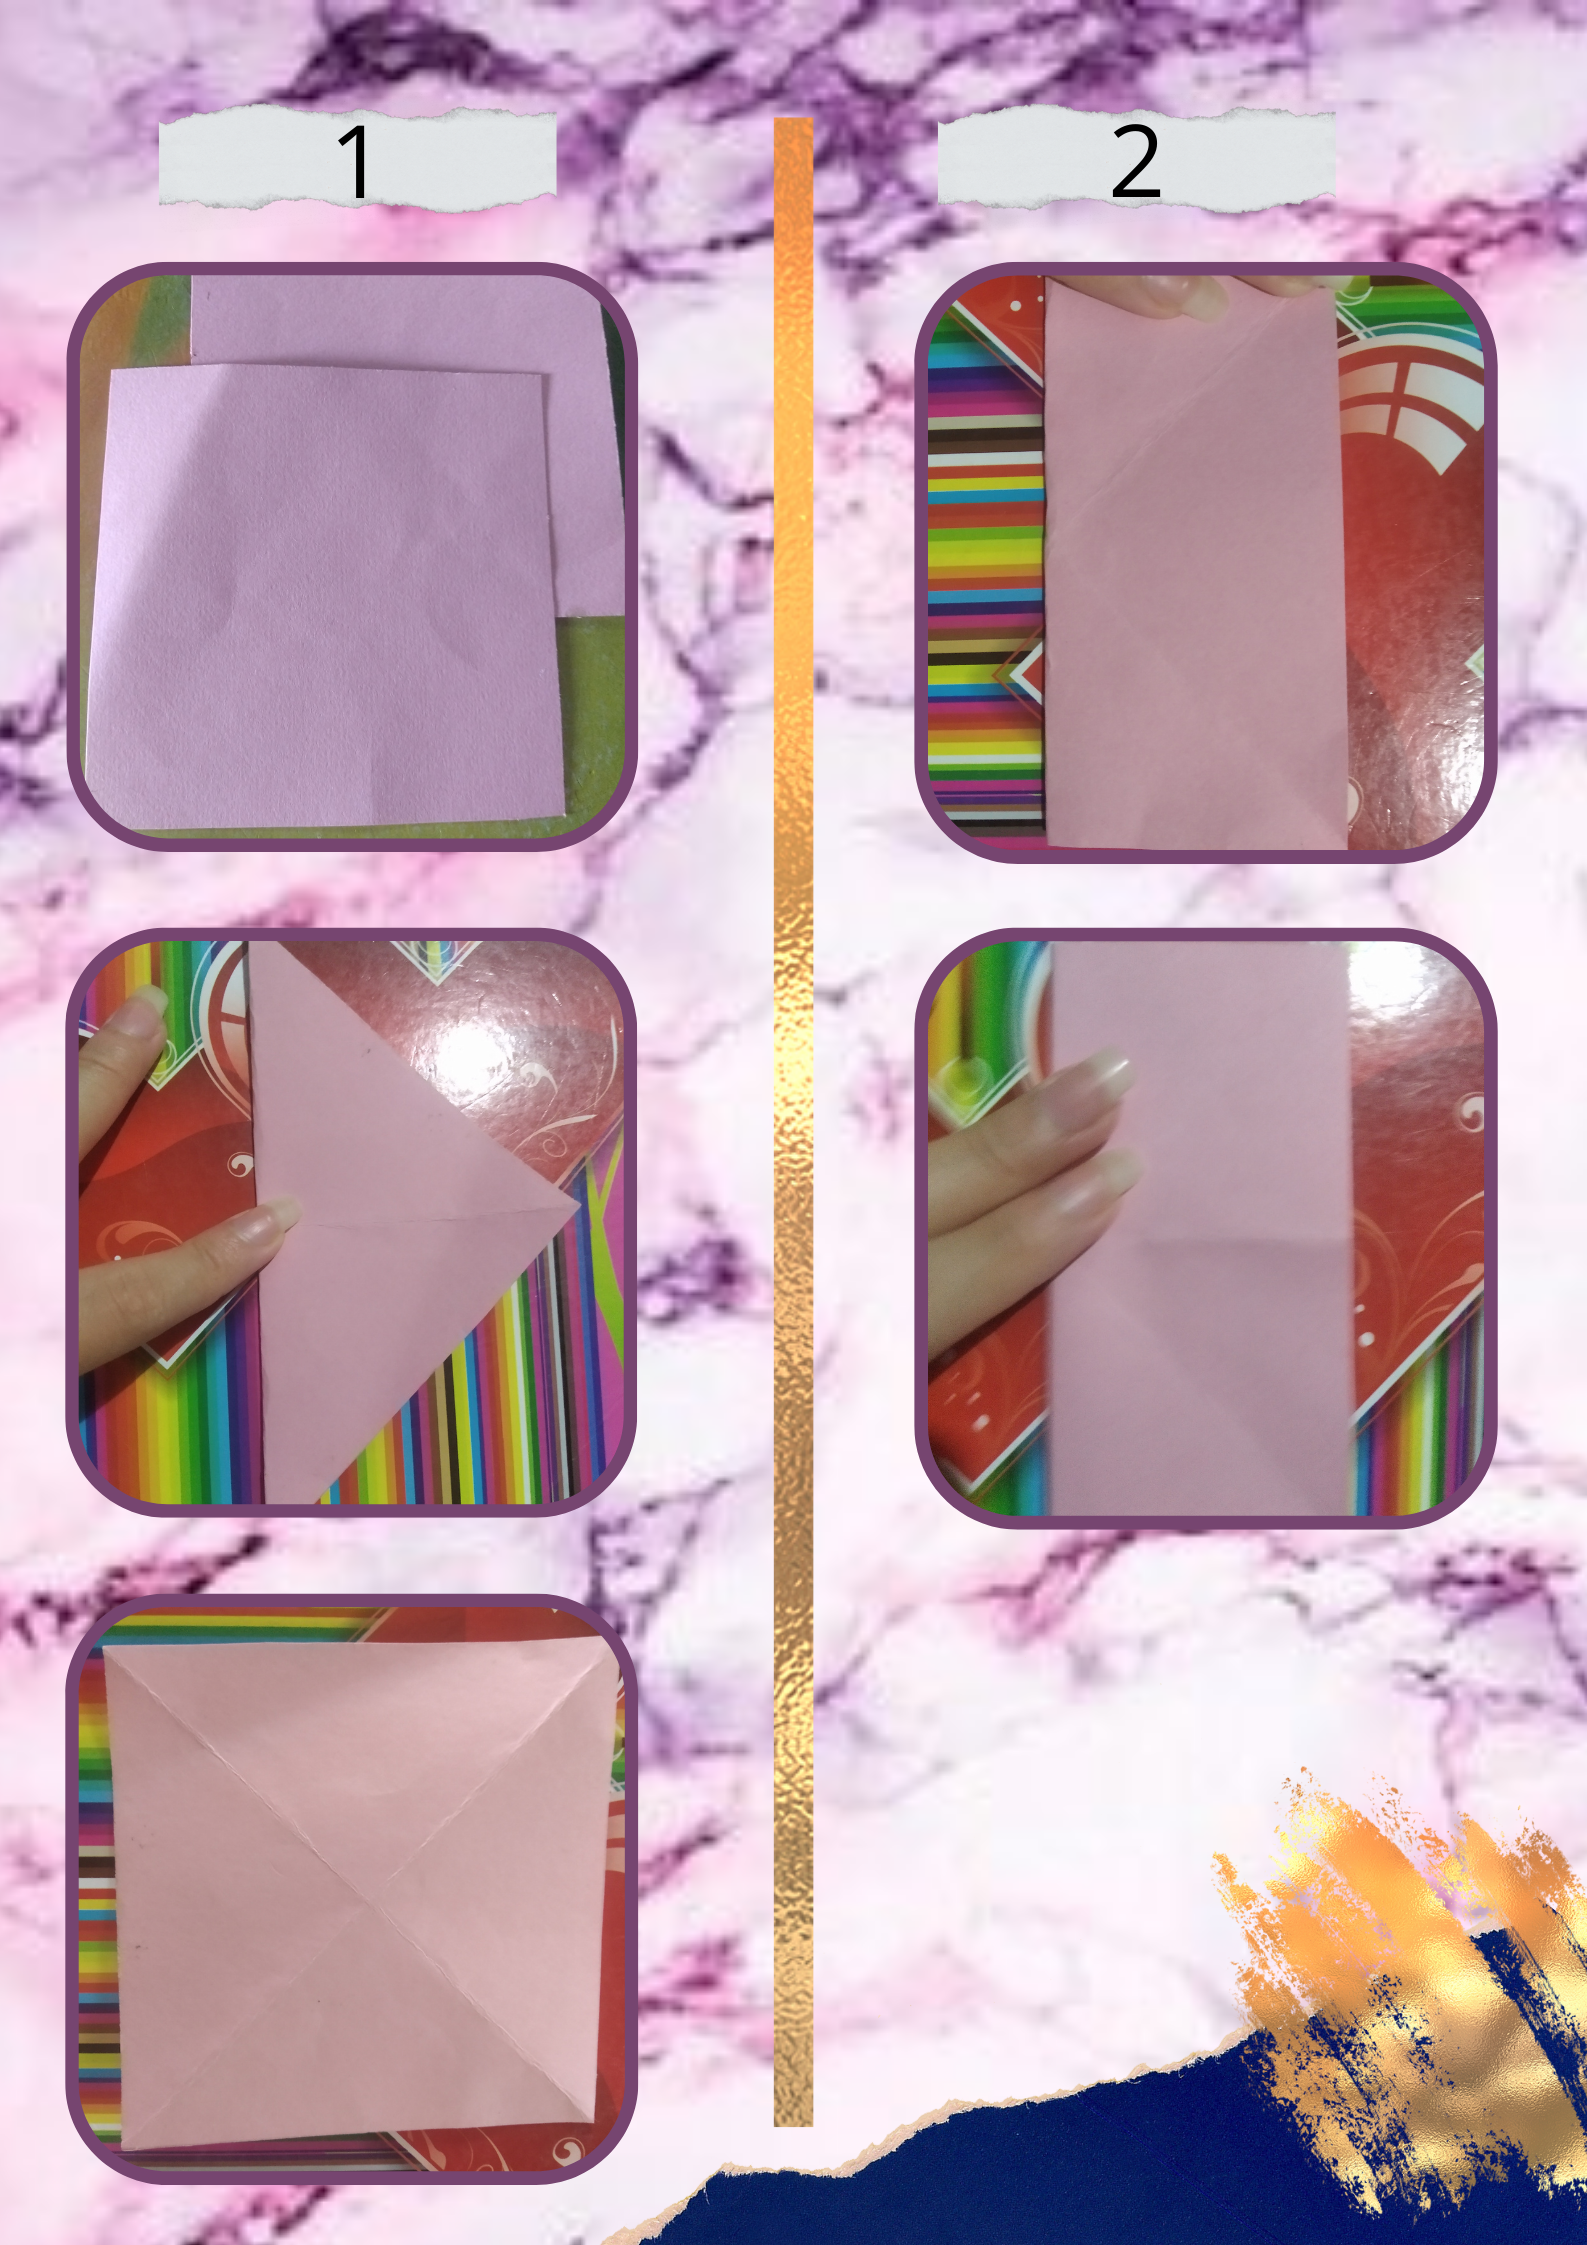
Paso 1:
Step 1:
Vamos a partir teniendo dos cuadrados de igual medida, la medida va a depender del tamaño que lo queramos, es nuestra elección, luego vamos a tomar uno de ellos y lo doblaremos, esquina con esquina, de lado y lado, o sea, llevando una punta, hacía el otro extremo, de esta manera se reflejará un triángulo, como pueden ver, queda con una clase de equis, después haremos un doblez a la mitad dos veces, de un lado y del otro, como pueden apreciar en la imágen.
We will start by having two squares of equal size, the size will depend on the size we want, it is our choice, then we will take one of them and fold it, corner to corner, side to side, that is, taking one end, to the other end, thus reflecting a triangle, as you can see, is with a kind of X, then we will make a fold in half twice, on one side and the other, as you can see in the image.

Paso 2:
Step 2:
De esta manera procederemos a juntar las partes de ambos lados, formando cuatro picos, como se muestra, y así seguimos a aplastar dos contra lo otros dos, formando un tipo de cuadrado, en el cuál vamos a doblar las dos esquinas hacía la parte del centro, y así, de igual forma haremos con el otro lado. Ahora con el pliegue que se creó, vamos a meter el dedo para levantarlo y aplastaremos logrando marcar muy bien, así sucesivamente hasta hacer lo mismos con todos los que quedán, todo como se muestra.
In this way we will proceed to join the parts of both sides, forming four peaks, as shown, and so we continue to crush two against the other two, forming a kind of square, in which we will fold the two corners to the center part, and so, in the same way we will do with the other side. Now with the fold that was created, we are going to put our finger to lift it and flatten it, marking it very well, and so on until we do the same with all the remaining ones, all as shown.

Paso 3:
Step 3:
De esta forma nos van a quedar esta clase de picos hacia abajo, dónde tenemos que acomodar los lados a mitad, cuatro y cuatro, para después marcar unas curvas en la parte de abajo y proceder a recortar, formando así nuestra primera parte del paraguas, y así mismo, haremos otra pieza exactamente igual, con nuestro otro cuadrado, lo único distinto es que vamos a recortar de forma diagonal a los lados.
In this way we will have this kind of peaks down, where we have to arrange the sides in half, four and four, and then mark some curves at the bottom and proceed to cut, thus forming our first part of the umbrella, and likewise, we will make another piece exactly the same, with our other square, the only difference is that we are going to cut diagonally to the sides.
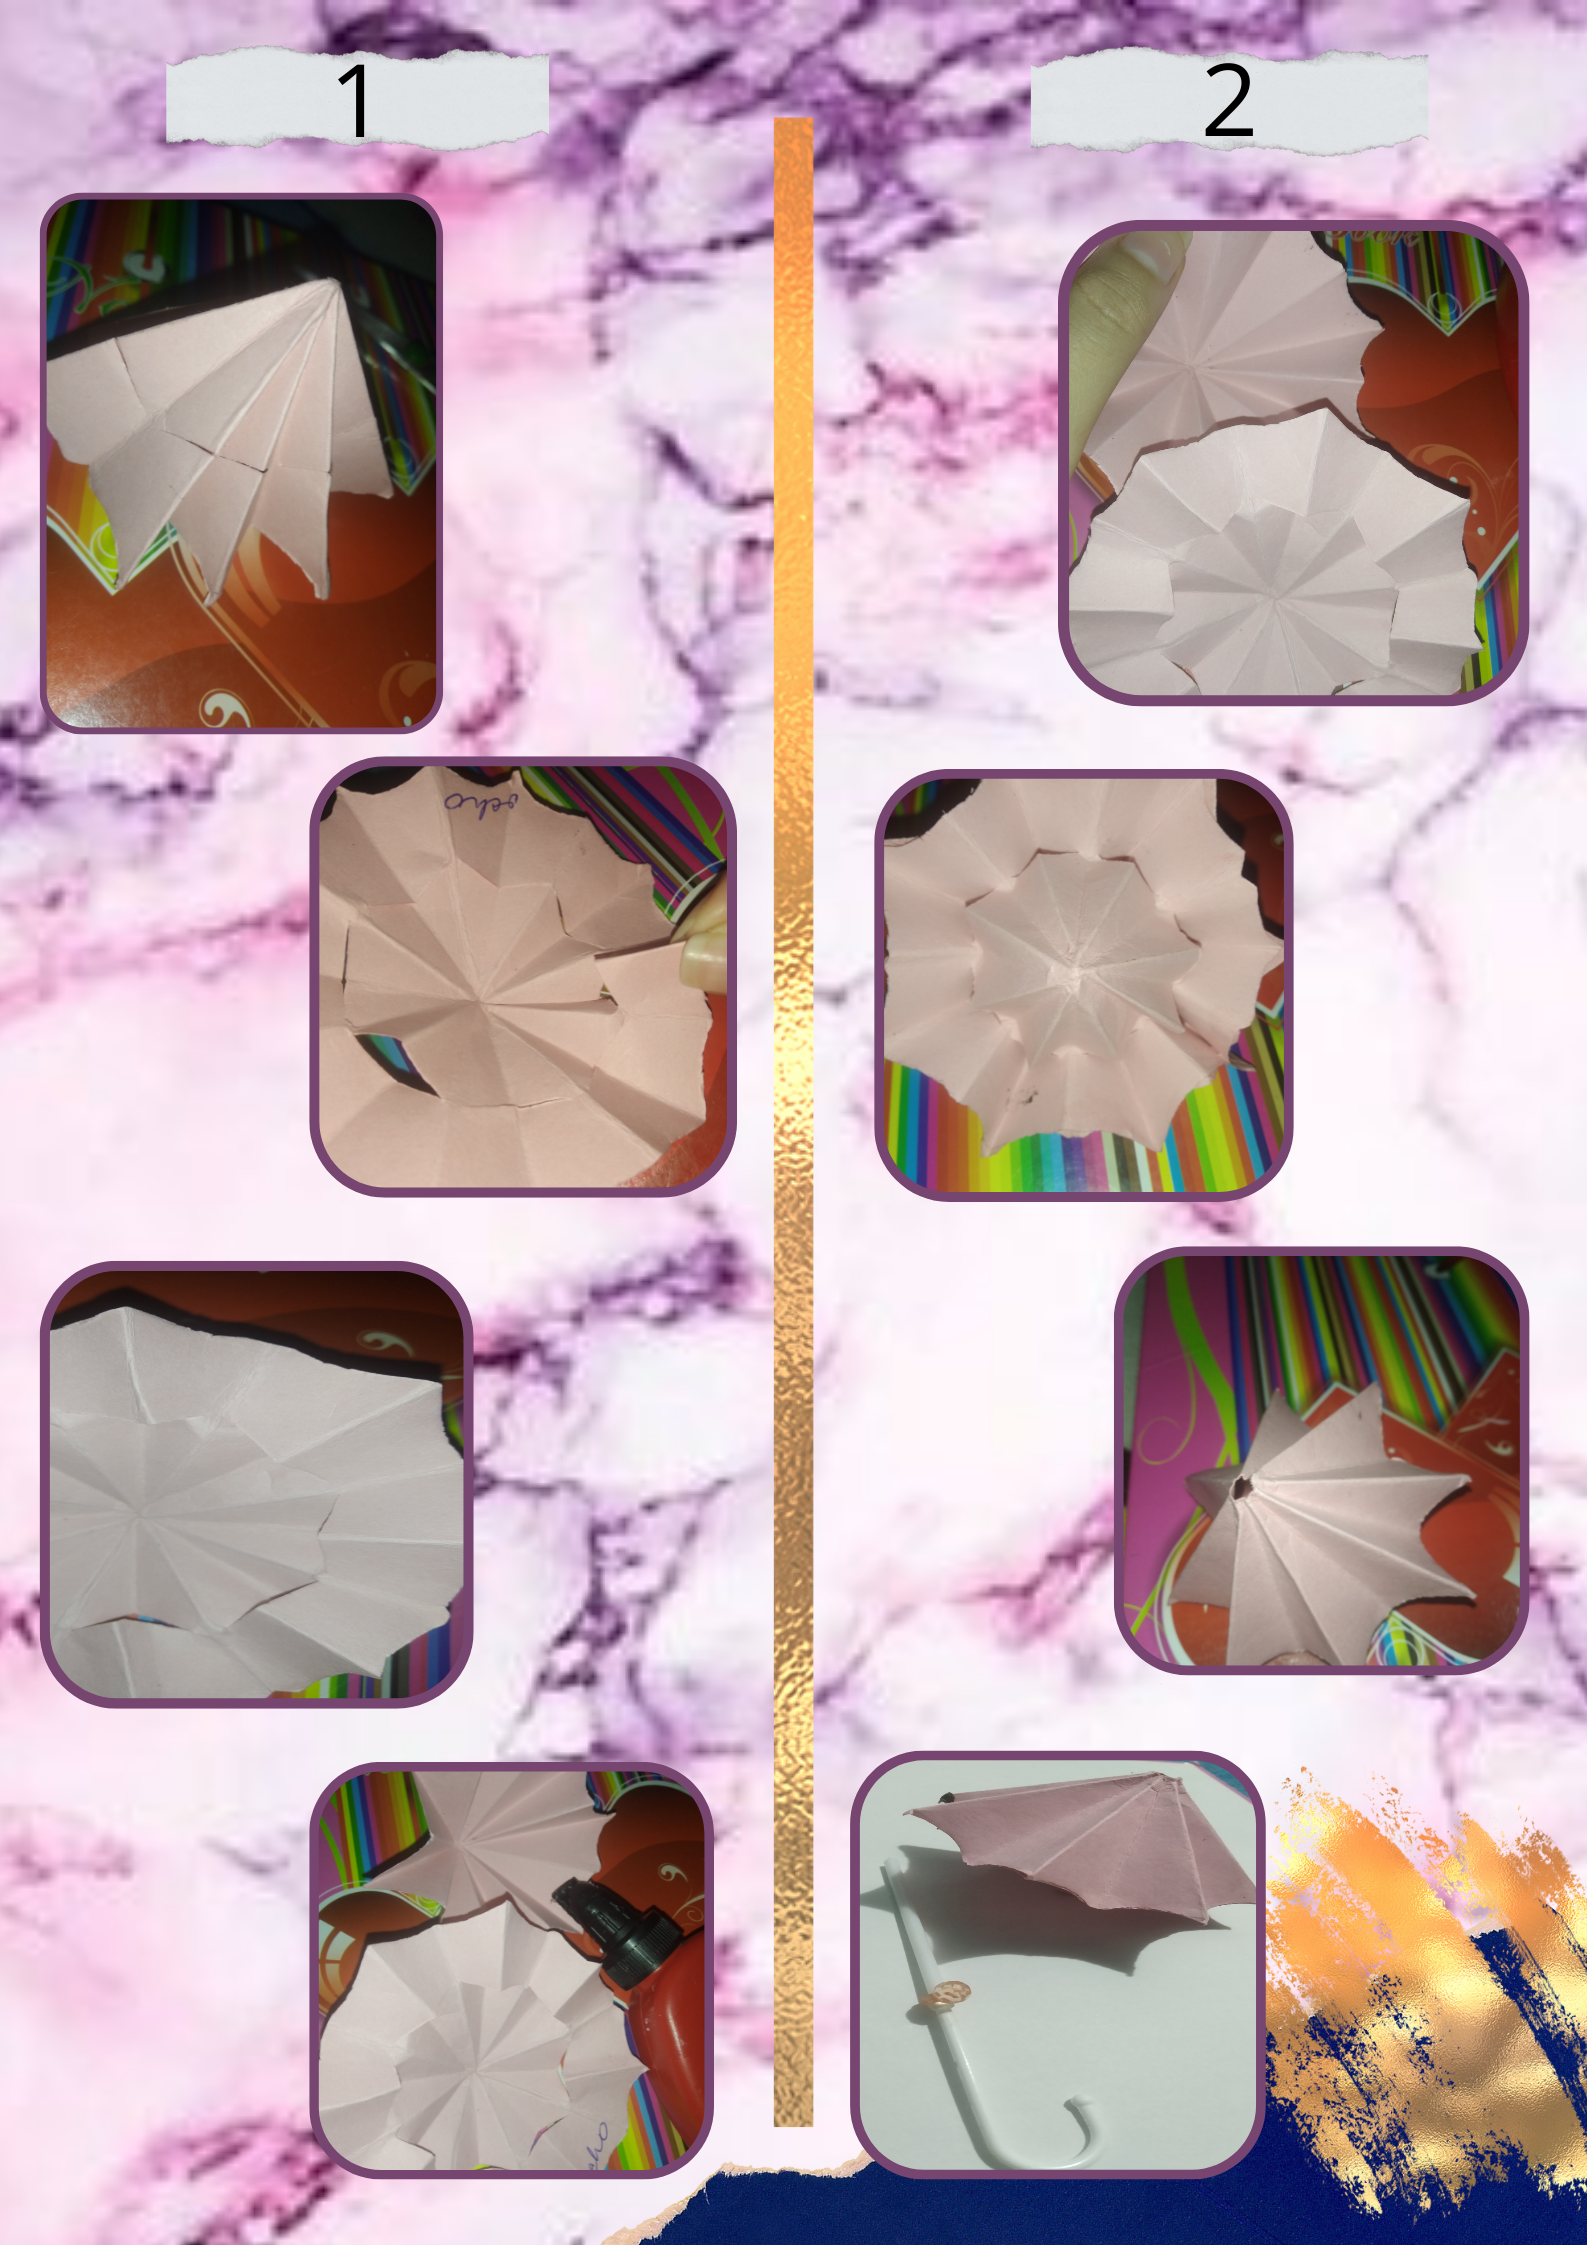
Paso 4:
Step 4:
A cerca de esta pieza, ahora vamos a tomar las esquinas que no estén pegadas y las vamos a remarcar con nuestro dedo, para lograr de esta forma una figura como la que se muestra, que es la parte que va hacer que el paraguas cierre y a su vez abra, teniendo estás ambas piezas listas las vamos a unir con pega, esquina con esquina, con mucho cuidado para que no quede mal, y vamos a dejar secar muy bien por unos cuantos minutos, cuando ya esté seca, vamos a hacer un pequeño corte al pico de abajo y de arriba, está entrada será por dónde vaya el palito, el cuál puede ser hecho con papel, o uno que ya tengas por ahí, en mi caso, este es uno igual al de una sombrilla que venía junto a un chocolate, y desde que lo ví lo guardé, porque sabía que me serviría más adelante para algo que tuviera que ver con sombrillas, aunque esté era un poco corto, por lo que me las ingenié para encajarle un palito de chupeta del mismo color, me gustó porque le da ese toque aún más real, y bueno así solo queda insertarlo por los orificios y asegurarlo con un abalorio que quede justo y con silicón, yo utilicé caliente.
About this piece, now we are going to take the corners that are not glued and we are going to mark them with our finger, to achieve in this way a figure like the one shown, which is the part that will make the umbrella close and in turn open, having both pieces ready we are going to join them with glue, corner to corner, very carefully so it does not look bad, and we will let it dry very well for a few minutes, when it is dry, we will make a small cut at the bottom and top peak, this entrance will be where the stick will go, which can be made with paper, or one that you already have around, in my case, this is one like an umbrella that came with a chocolate, and since I saw it I kept it, because I knew it would serve me later for something that had to do with umbrellas, although this one was a little short, so I managed to fit a lollipop stick of the same color, I liked it because it gives it that touch even more real, and well now all that's left is to insert it through the holes and secure it with a bead that fits just right and with silicone, I used hot.
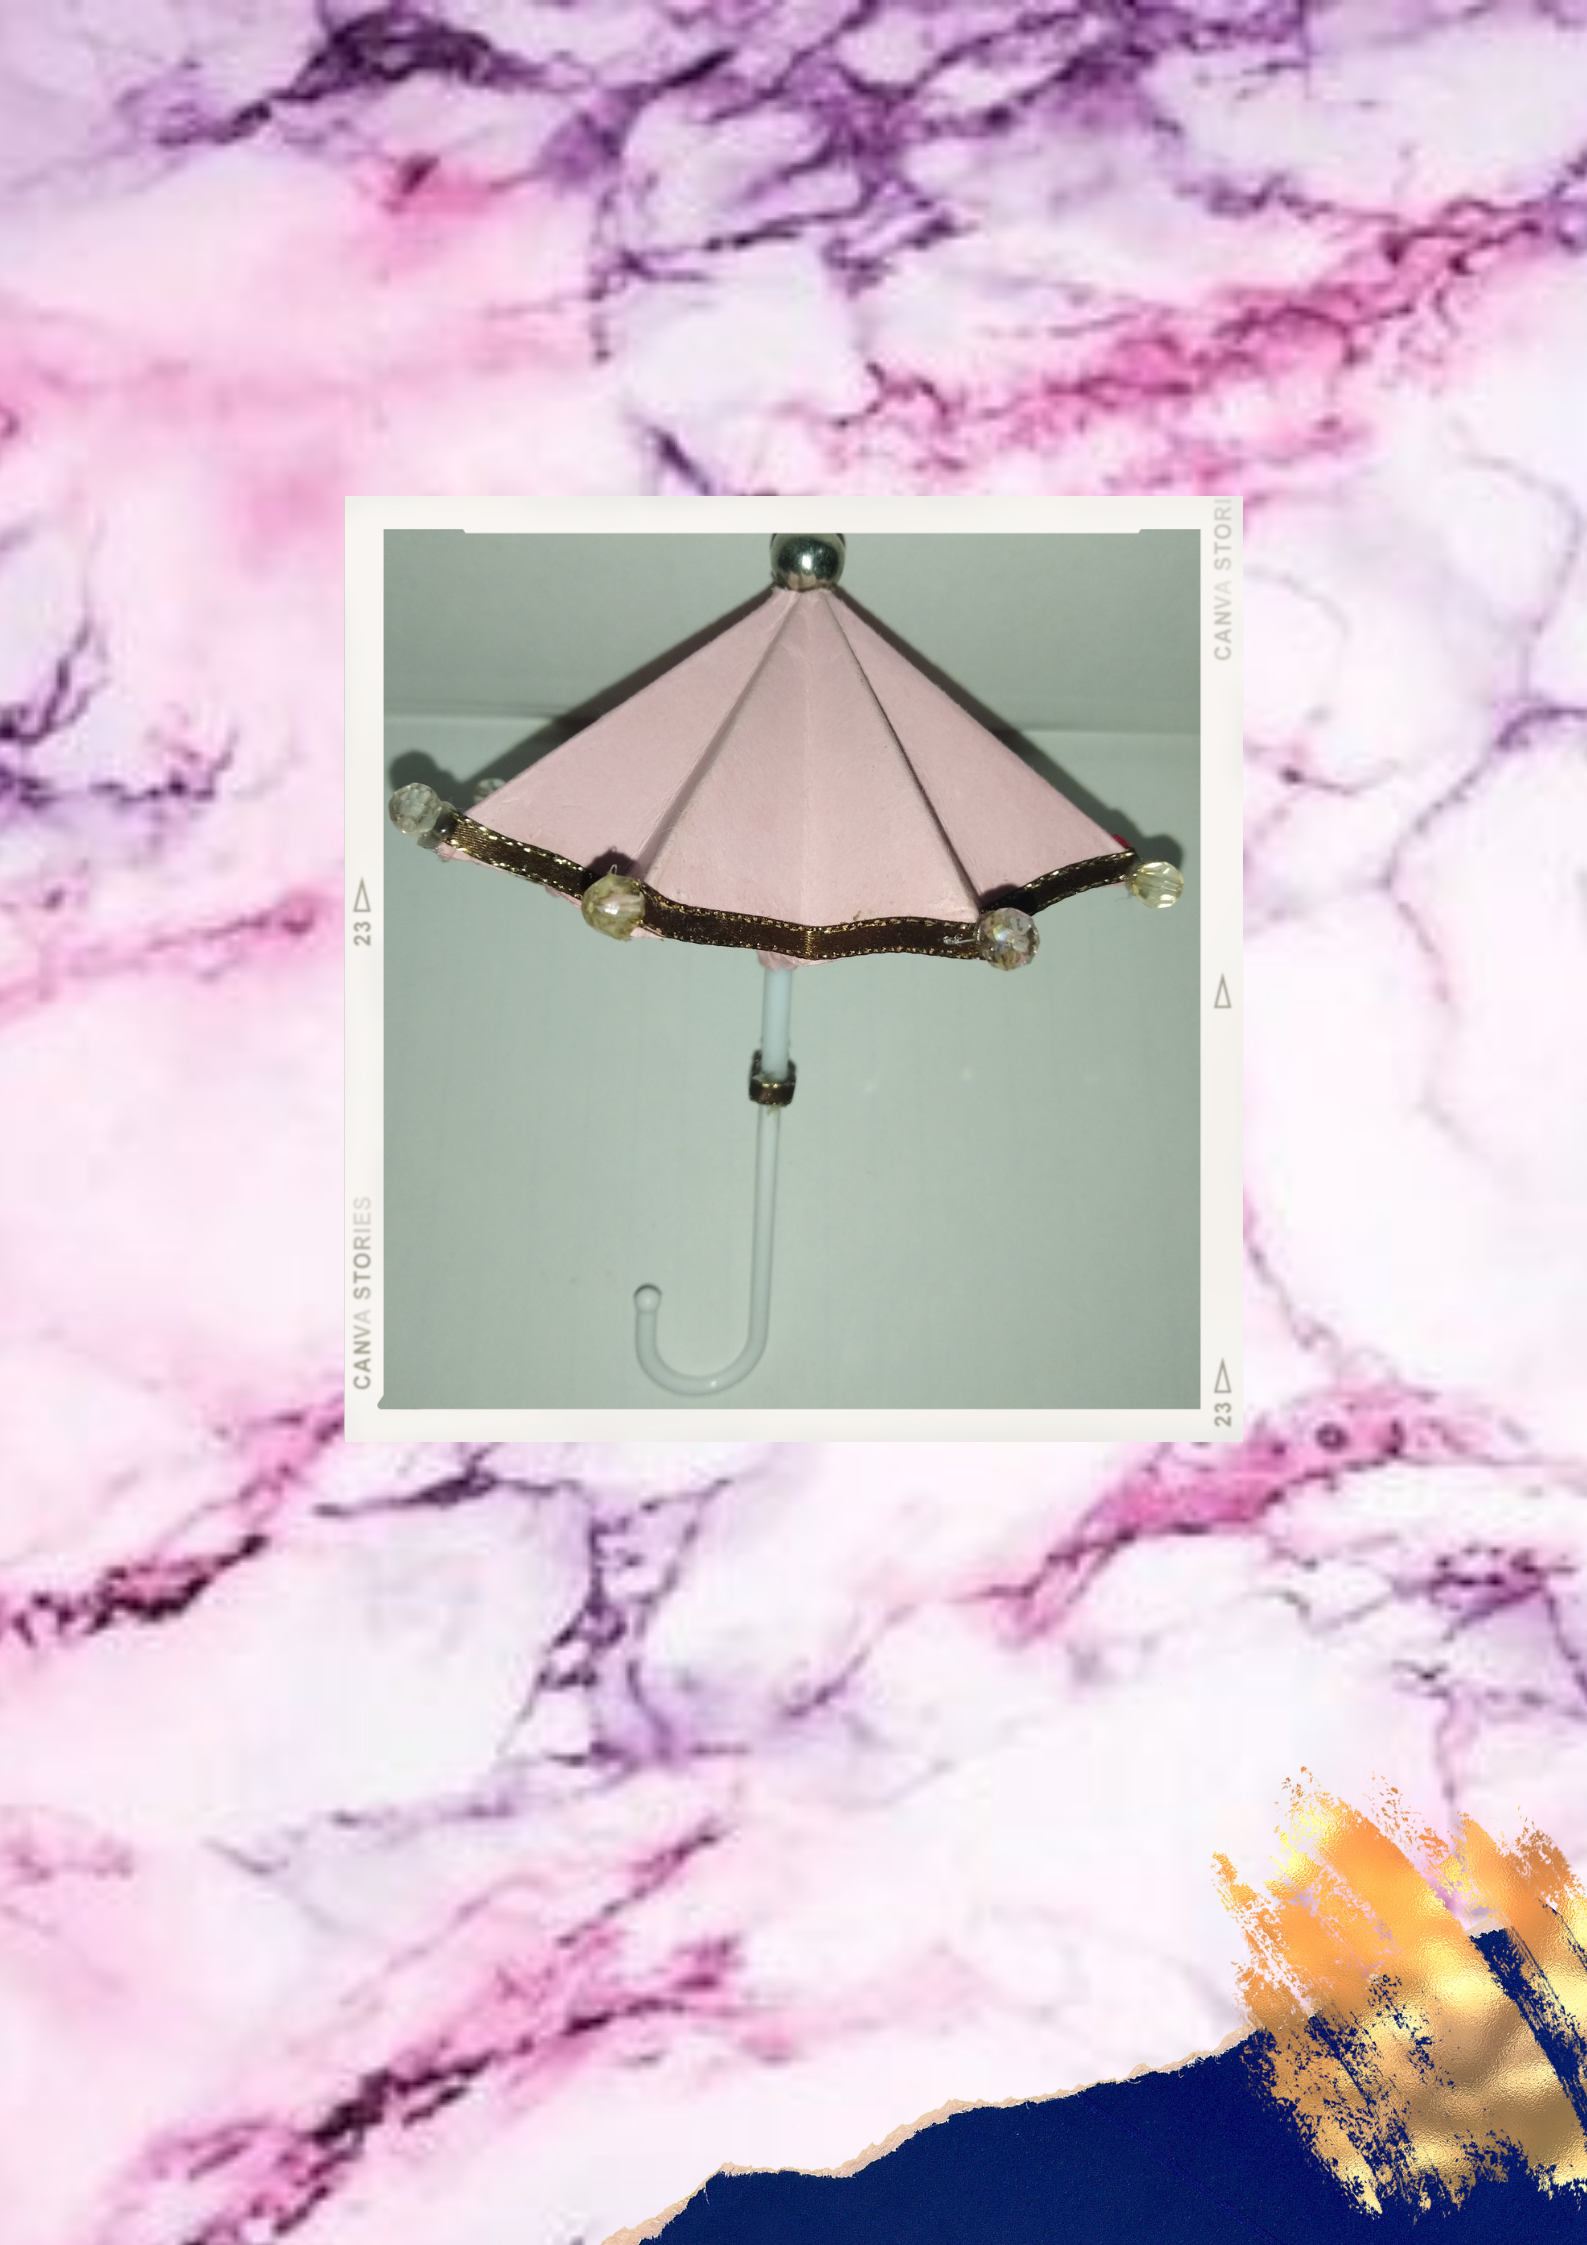
Paso 5:
Step 5:
Ahora viene mi parte favorita y apuesto que al igual la de muchosss, la parte de decorar, sinceramente es la mejor parte para mí, poder agregar nuestra creatividad a una creación, además de ese toque único que tiene cada uno, lo hace mucho mejor, además los detalles le dan un toque mucho más hermoso a las cosas, yo le agregué cinta decorativa y algunos abalorios en cada esquina, y ya estuvo, una decoración sencilla, pero bonita, eso sí.
Now comes my favorite part and I bet it is the same for many, the decorating part, honestly is the best part for me, being able to add our creativity to a creation, plus that unique touch that each one has, makes it much better, plus the details give a much more beautiful touch to things, I added decorative ribbon and some beads in each corner, and that was it, a simple decoration, but beautiful, yes.

¡Y listo! Ya estaría lista nuestra mini sombrilla para decorar, debo admitirles que me fascinó el resultado de este, estoy emocionada por poder hacer más y decorar un respectivo espacio con ellos, ¡unos morados me encantarían! Incluso ví unos más pequeños decorando una bebida/cóctel, queda espectacular. Espero que les haya encantado tanto como a mi, y no duden en intentarlo, es fácil y sencillo de hacer para lo bonito que queda.♡
And that's it! Our mini umbrella is ready to decorate, I must admit that I was fascinated by the result of this one, I'm excited to make more and decorate a respective space with them, I would love some purple ones! I even saw some smaller ones decorating a drink/cocktail, it looks spectacular. I hope you loved it as much as I did, and don't hesitate to give it a try, it's easy and simple to make for how pretty it looks.♡
Les agradezco una vez más por leer este post y por su apoyo, esperando seguir por acá seguido, para compartirles las cosas que me gustan hacer y que puedan aprender.
I thank you once again for reading this post and for your support, I hope to continue to be here often, to share with you the things I like to do and that you can learn.
Gracias por leer, hasta la próxima mi gente, un abrazo enorme.♡
Thanks for reading, until next time my people, a huge hug.♡
No me creerás pero en estos días estaba buscando cómo hacer uno, nada fácil eh? Parece un origami, voy a guardar la publicación para ir practicando.
Que coincidencia, no lo pienses dos veces, quedán muy lindos, no es difícil inténtelo. Sí, es algo así, sería muy buena idea, suerte y saludos.💗✨