Participando en el Concurso "AMOR Y PASIÓN" de HIVE DIY. "Mi payaso favorito"

Hola mi gente hermosa
Feliz de participar en este concurso que nos permite expresar de una forma única ese amor que sentimos por las personas que amamos.
Siempre es buen momento para demostrar el Amor, pero hay ocasiones en que un detalle especial puede hacer que esa persona que amas sea realmente feliz.

Mi detalle especial se lo realicé a mi esposo, desde que el llegó a mi vida mi mundo ha cambiado cada día para mejor , y aquí entre nos, estoy súper enamorada.
Una de las cualidades que más me gustan de César ( @filoriologo) es su capacidad de servir, lo hace de muchas formas, y una de mis favoritas es como miembro de DOCTOR YASO, una ONG que busca llevar felicidad a las personas que están en los hospitales. Una vez se les permitió llevar a un familiar para que vieran su trabajo y él me invitó, cuando lo acompañé en esa visita mi corazón quedó impactado, pues es una labor muy hermosa, llevar sonrisas y alegría a las personas que están pasando por momentos dificiles.
Otra de las actividades que realiza mi amor es el de ser Lider de Yoga de la risa, cuando lo conocí antes de ser novios asistí a una de sus sesiones, totalmente gratuitas que daba en el Parque del Este de la ciudad, allí mediante sus actividades ayuda a muchas personas que necesitan un espacio para drenar, para reir y para encontrarse con la felicidad, esto me enamoró por completo, poder conseguir un ser con quién pudiera reir y también vivir una vida llena de muchas aventuras.
Por estas razones mi esposo es "MI PAYASO FAVORITO" , lo admiro y siento que soy muy afortunada al tenerlo como compañero de vida.
Cuando leí el concurso pensé qué podía hacerle un payasito, además que fue perfecto porque no tenía nada que regalarle y en casa andamos bajos de presupuesto porque mi papá ha sido diágnosticado con cancer de próstata, así que me puse manos a la obra y comencé a buscar entre todos mis materiales y conseguí una bolsita con un material premezclado parecido al yeso que me envió una amiga y se me ocurrió la idea de hacerle un Payaso PortaLápices, uno en honor a lo que hace y dos porque siempre anda peleando porque no consigue sus lápices o el lapicero.
Como detalle especial le coloqué una mariposa azul en la mano, pues eso es lo que me caracteriza, amo las mariposas azules, tengo varias tatuadas en mi cuerpo y con esto también quise reflejar que me tiene en sus manos, jajaja.
Así pues, vamos a contarle como hacer mi detalle:
El tiempo total para realizar este obsequio fueron tres dias:
1 dia para armar el molde, 1 día para vaciar la mezcla y esperar que se secara y 1 dia para pintar y montar con todos los detalles.
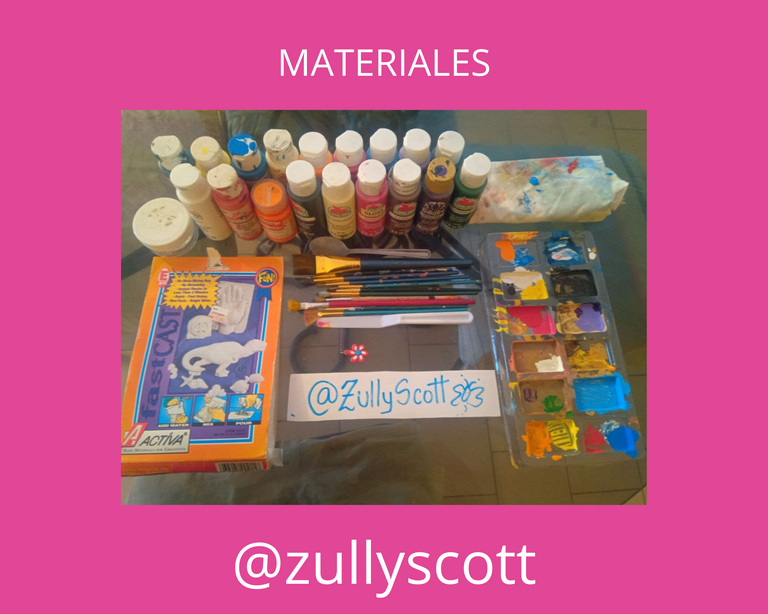
Materiales:
1 bolsa de yeso especial premezclado .(Tu puedes usar yeso o barbotina)
Pinceles de varios tamaños
Cinta de yeso instantáneo (Tu puedes usar papel maché)
Pinturas al frío de varios colores
Paleta mezcladora
Un aplique de florecita
Pistola de silicón caliente
Plástidedo o plastilina
Un cd usado para reciclar
Un tubito de M&M vacío.
Un exacto
Tirro blanco
Agua
Pote para mezcla
Un pañito para limpiar los pinceles.
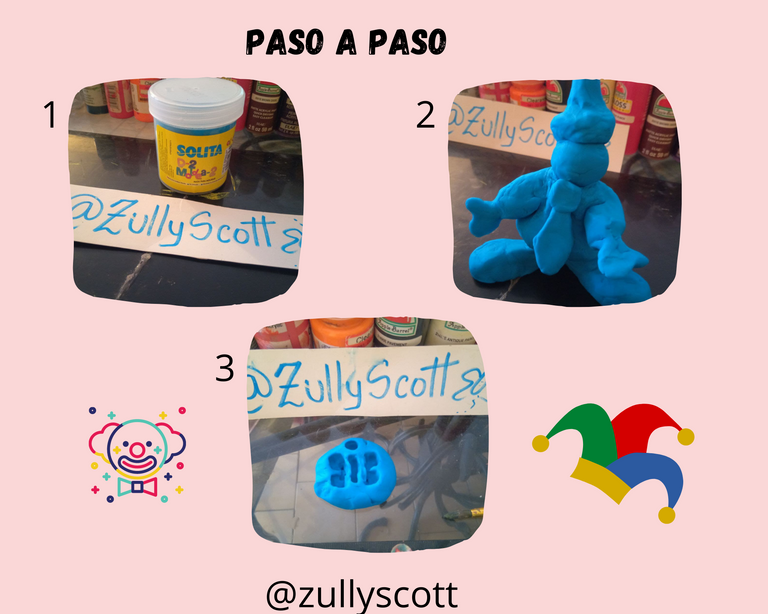
1 Saca el plastidedo del pote y amasa hasta que quede sueve.
2 Moldea el payaso a tu gusto usando el plastidedos.
3 Con la parte trasera de un pincel vamos a crear un molde de una mariposa, abriendo espacio donde se pueda vaciar la mezcla posteriormente.
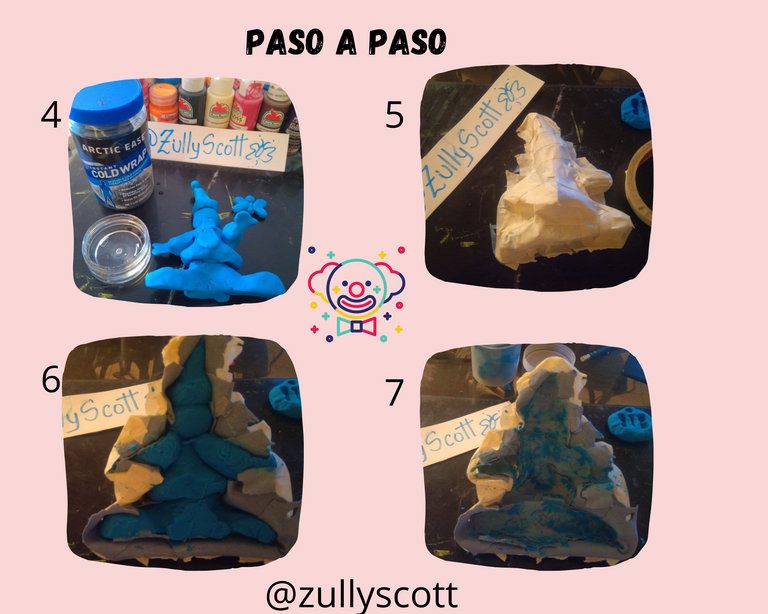
4 Con el payaso listo, acuéstalo sobre una superficie y comienza a cubrir con el yeso instantaneo (Esto es una tela especial para colocar en el cuerpo en caso de fractura, si no tienes puedes usar papel maché, yo no lo usé porque no tenía engrudo ni pega blanca).
5 Una vez que la venda de yeso esté dura, cubre con tirro blanco para darle más fortaleza, luego espera que sequé bien por lo menos 8 horas.
6 Al secarse con mucho cuidado voltea la figura.
7 Con un cuchillo o una paletita saca el plastidedo del molde que has creado, ya está listo para ser usado.
8 En el pote coloca la mezcla de yeso en polvo y ve agregando agua hasta que se haga una pasta homogénea ni tan aguada ni tan espesa, término medio.
9 Vacía la mezcla tanto en el molde del payaso como en el molde de la mariposa.
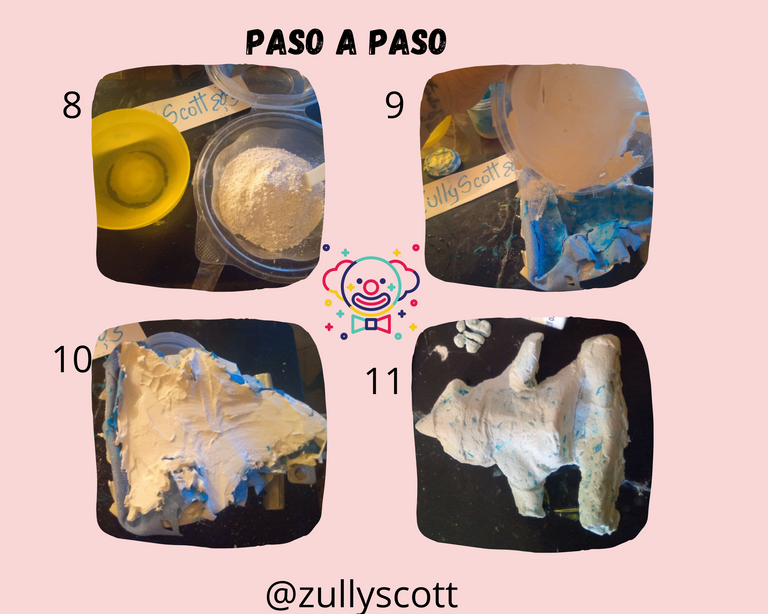
10 Luego espera 24 para que seque bien.
11 Retira el tirro y la tela de yeso, con el exacto quita todas las imperfecciones y con una lija puedes darle un mejor retoque, yo no tenía lija así que tuve que dejarlo así.

12 Luego usando las pinturas al frío comienza a darle color al payaso.
13 Primero pinta toda la superficie de los colores bases.
14 Luego pinta los detalles en la ropa y rostro.
15 Para finalizar, usando la pistola de silicón caliente pega el payaso a la base que será el cd usado y apóyalo en el tubo de plástico, con la abertura hacia arriba ya que allí irán los lápices.Con el silicón pega la mariposa a una de las manos del payaso.
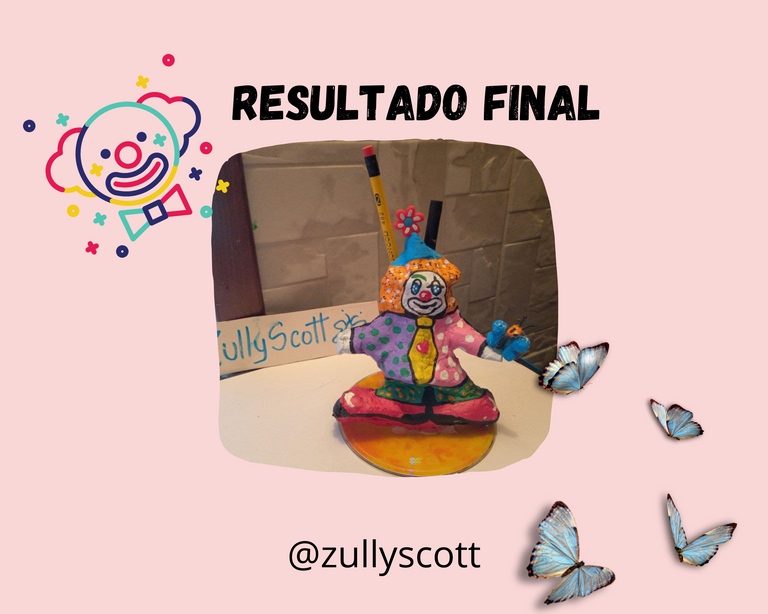
Así quedó mi lindo payasito, con la mariposa en la mano listo para regalarselo a mi Amor bonito.

Y aquí le entregué el obsequio, un día antes porque debía hacer la foto para el post, luego lo guardé y le dije que se lo daba el 14 y que tenía que sorprenderse igual, tal vez lo acompaño de un chocolate sorpresa.
Hacer estos obsequios son una experiencia increíble, porque dedicas tiempo para esa persona que amas y es una manera muy linda de demostrar cuán especiales son los seres que tenemos en nuestras vidas. Me siento muy feliz, además que pude regalarle algo útil y hecho con mis manitas a mi Humano favorito de todos los Multiversos.
Invito a participar en esta iniciativa a @jicrochet y a @anjiart.
GRACIAS POR HABER DEDICADO TIEMPO VALIOSO DE TU VIDA A LEERME
CON AMOR
ZULLY

ENGLISH
Hello my beautiful people
Happy to participate in this contest that allows us to express in a unique way that love we feel for the people we love.
It is always a good time to show Love, but there are times when a special detail can make that person you love really happy.
I made my special gift to my husband, since he came into my life my world has changed every day for the better, and between us, I'm super in love.
One of the qualities I like most about Cesar ( @filoriologo) is his ability to serve, he does it in many ways, and one of my favorites is as a member of DOCTOR YASO, an NGO that seeks to bring happiness to people who are in hospitals. Once they were allowed to bring a family member to see their work and he invited me, when I accompanied him on that visit my heart was impacted, because it is a very beautiful work, bringing smiles and joy to people who are going through difficult times.
Another of the activities that my love does is to be a leader of Laughter Yoga, when I met him before we were engaged I attended one of his sessions, totally free that he gave in the East Park of the city, there through his activities he helps many people who need a space to drain, to laugh and to find happiness, this made me fall in love completely, to get a being with whom I could laugh and also live a life full of many adventures.
For these reasons my husband is "MY FAVORITE CLOWN". I admire him and I feel that I am very lucky to have him as my life partner.
When I read the contest I thought I could make him a clown, plus it was perfect because I had nothing to give him and at home we are low on budget because my dad has been diagnosed with prostate cancer, so I got down to work and started looking through all my materials and got a little bag with a pre-mixed material similar to plaster that a friend sent me and I came up with the idea of making him a Pencil Holder Clown, one in honor of what he does and two because he is always fighting because he can't get his pencils or pencil holder.
As a special detail I put a blue butterfly on his hand, because that's what characterizes me, I love blue butterflies, I have several tattooed on my body and with this I also wanted to reflect that he has me in his hands, hahaha.
So, let's tell you how to make my detail:
The total time to make this gift was three days:
1 day to assemble the mold, 1 day to pour the mixture and wait for it to dry and 1 day to paint and assemble with all the details.
Materials: 1 bag of special pre-mixed plaster
1 bag of special pre-mixed plaster (you can use plaster or slip).
Brushes of various sizes
Instant plaster tape (You can use papier-mâché)
Cold paints of various colors
Mixing palette
A flower applique
Hot silicone gun
Plasticine or play dough
A used CD to recycle
An empty tube of M&M's.
An exacto
White tyro
Water
Mixing pot
A small cloth to clean the brushes.
1 Take the plastidedo out of the pot and knead until smooth.
2 Mold the clown to your liking using the plastidedos.
3 With the back of a paintbrush we are going to create a mold of a butterfly, opening space where the mixture can be poured later.
4 With the clown ready, lay it on a surface and start covering it with the instant plaster (this is a special cloth to place on the body in case of a fracture, if you don't have it you can use papier mache, I didn't use it because I didn't have paste or white glue).
5 Once the plaster bandage is hard, cover it with white paper to give it more strength, then wait for it to dry well for at least 8 hours.
6 When dry, carefully turn the figure over.
7 With a knife or a small trowel remove the plastidedo from the mold you have created, it is now ready to be used.
8 In the pot place the powdered plaster mixture and add water until it becomes a homogeneous paste, neither too watery nor too thick, medium term.
9 Pour the mixture into both the clown mold and the butterfly mold.
10 Then wait 24 hours for it to dry well.
11 Remove the plaster and the plaster cloth, with the exacto remove all the imperfections and with a sandpaper you can give it a better touch up, I didn't have sandpaper so I had to leave it like this.
12 Then using the cold paints start coloring the clown.
13 First paint the entire surface with the base colors.
14 Then paint the details on the clothes and face.
15 Finally, using the hot silicone gun, glue the clown to the base that will be the CD used and support it on the plastic tube, with the opening facing upwards since the pencils will go there, and with the silicone glue the butterfly to one of the clown's hands.
This is how my cute little clown turned out, with the butterfly in his hand, ready to give to my beautiful Love.
And here I gave him the gift, a day before because I had to take the picture for the post, then I kept it and told him that I gave it to him on the 14th and that he had to be surprised anyway, maybe I accompany it with a surprise chocolate.
Making these gifts is an incredible experience, because you dedicate time to the person you love and it is a very nice way to show how special the people we have in our lives are. I feel very happy, plus I was able to give something useful and made with my little hands to my favorite Human of all Multiversos..
I invite @jicrochet and @anjiart to participate in this initiative.
THANK YOU FOR DEDICATING VALUABLE TIME OF YOUR LIFE TO READ ME.
WITH LOVE
ZULLY
Imágenes propias, editado con CANVA.
Translated with www.DeepL.com/Translator (free version)
Electronic-terrorism, voice to skull and neuro monitoring on Hive and Steem. You can ignore this, but your going to wish you didnt soon. This is happening whether you believe it or not. https://ecency.com/fyrstikken/@fairandbalanced/i-am-the-only-motherfucker-on-the-internet-pointing-to-a-direct-source-for-voice-to-skull-electronic-terrorism
Que ternura...ese toque de la mariposa en la mano está super cuchi...El payaso luce con personalidad alegre 😍
Siii, el payaso tiene su energía, tierno y alegre. Gracias por siempre estar.
Gracias por el apoyo y por valorar mi contenido. Abrazos
https://twitter.com/zullycscott/status/1492998535205343232
The rewards earned on this comment will go directly to the person sharing the post on Twitter as long as they are registered with @poshtoken. Sign up at https://hiveposh.com.
Esos chocolates ya no son tan sorpresa.
Me enamoré de ese payaso (el de la manualidad para el concurso) quedó muy lindo. Los colores bastante llamativos. El proceso tiene su nivel de complejidad.
Gracias por dejarnos el paso a paso con detalles. Feliz día 🤗🐝🙋
Awww, gracias se hizo con mucho amor, y si, leyó el post pero igual le di los chocolates, jajaja
Wow esto si que es amor creativo alegre con pertenencia con todo pues, esos detalles asi entre las parejas es lo que mantiene viva la llama del amorrrr , me encantó, le regalaste un mini de él y tienes un payasito de verdad en tu vida, realmente eres full afortunada, eso si que es Amorrrrr de verdad, ese que te hace feliz y volar en las nubes, excelente post muchas bendiciones y que amor perdure toda la eternidad 😍😎
Amor del bueno mi Naty, jajaja, gracias por comentar y por tus bendiciones.
Aeww que bello de verdad amiga. Me gusta su cara de felicidad, les deseo lo mejor del mundo
Gracias, le gustó mucho su detalle. Gracias por pasar , es un honor.
Qué bonito, Zully. La labor de tu esposo es un gran ejemplo de humanidad y solidaridad. Me encantó tu participación. Es muy emotiva y creativa. Felicitaciones y mucha suerte en el concurso. Un abrazo, amiga.
Si, esa experiencia de Los Dr. Yaso es muy bonita, gracias por tu apoyo y por tus lindas palabras, abrazos de vuelta.
Tu publicación nos ha sacado muchas sonrisas y alegría. Deseamos tengan un maravilloso día de san Valentín.
Gracias por participar en el concurso.
Gracias por el apoyo, me encantan estas actividades como buena Maestra de preescolar, a veces me paro por falta de materiales pero siempre la creatividad hace posible muchas cosas.
Qué hermosa manera de expresar amor, Felicidades por tan hermoso resultado
Muchisimas gracias por tus palabras, se hizo con amor
La labor del payaso o clown es una de las más difíciles, sobretodo si el público es infantil, ellos no mienten si les gusta o no algo.
Fue un gran obsequio ❤️